Cross Domain and Cross Device Consent
With the OneTrust CMP, you have the ability to share and link consent given by a user on one Website or Mobile App across your other managed Websites and Mobile Apps. This is achieved through a user profile that contains the consent given by the user from the first property interaction. The user profile is shared across the OneTrust cloud to additional devices or browsers where the user chooses to roam, safely creating a seamless user experience.
How does it work?
Once a user is identified, via logging in for example (though we do not require this method), their unique user identifier is passed to OneTrust. We'll use this unique identifier to create a profile which will hold all the choices they made on the banner or preference center.
The next time the user logs in on a property with cross domain implemented, OneTrust will first look for that user ID in our cloud and return with the previously gathered consent configuration. We'll then sync their consent on their device or browser so that it can be read by your integrations. Additionally, the banner will not re-appear.
User Journey Examples
Banner will not re-appear
For the banner to not re-appear, the user profile will need to be 100% synced on the app/site. For example:
- User navigates to a website that requires consent for Purposes A and B. User consents to Purposes A and B.
- The user then logs into the Mobile App that requires consent for Purposes A and B. Since consent for both Purposes A and B are synced, the banner UI will not re-appear for the user.
Banner will re-appear
The banner UI will re-appear if:
- Purposes are mismatched:
- User navigates to a website that requires consent for Purposes A and B. User consents to Purposes A and B.
- The user logs into the Mobile App that requires consent for Purposes A, B and Z. Consent for both A and B are synced, but the banner is shown because user has not consented to Purpose Z before.
- Syncing is incomplete
Key Points for Implementing Cross Device/Domain Consent
- Purposes must be shared across Web and Mobile properties.
- Only fully synced profiles will result in the banner not re-appearing for the user.
- User identifier should be passed before OneTrust script is loaded or the OneTrust SDK is initialized.
- User identifier can be any unique identifier of your choosing, e.g. email, phone number, unique user ID.
- Consent is shared within a consent group.
- Consent is stored on the OneTrust cloud. This allows us to share consent not only across domains, but across different devices and applications as well.
- Customers should implement a backend component for generating JWTs as OneTrust does not support this functionality today. The JWT.io site has a lot of great resources for your reference.
- The sub claim is the only required field when creating the JWT. Other fields are optional but can be added depending on customer preference.
How to Pass User Identifiers to OneTrust
Prerequisites
- A reliable way to identify a user.
- The ability to create a JSON Web Token (JWT). This will be passed to OneTrust servers to authenticate your request to access a user's consent profile. For more information, see jwt.io.
- Upload a Public Key for the generated JWT in your OneTrust tenant.
Navigate to Settings
Under the Consent sub-section, click Public Keys
* Add the Public Key and click Save - Create a Consent Group in the Cookie Consent module
- Enable 'Capture Records of Consent' in the Geolocation Rule in scope
Creating JWT Auth Tokens
OneTrust does not create the JWT, this needs to be created by your team.
As a security best practice, we recommend generating the JWTs server-side. In this section, we will use the JWT.io site as a way to demonstrate the JWT auth token setup.
- Go to JWT.io site
- In the Decoded > PAYLOAD: DATA section, add the unique user identifier as the value for
"sub" - In the Decoded > VERIFY SIGNATURE section, add a value for
your-256-bit-secret.- This value is your Public Key, which you need to add to your OneTrust tenant via Settings > Consent > Public Keys
- In the Encoded section, copy the value. This will be your Auth Token in the Cookies and Mobile SDK Cross Device Consent configurations.
Website Setup
- Identify the user. This can be done using your existing authentication methods.
- Configure the
OneTrustJavaScript variable:id: unique user identifierisAnonymous: set asfalseto create/update user profiles in OneTrusttoken: The JWT that you produce with the unique user identifier.
<script>
	var OneTrust = {
		dataSubjectParams: {
			id: "[Insert User ID Here]",
			isAnonymous: false,
			token : '[Insert JWT Here]'
		}
	};
</script>
Notes
- Make sure dataSubjectParams script is injected before the main OneTrust script.
- Once a domain is added in 'Consent Groups', the cookie consent script for that domain will be updated to reflect the addition of cross domain/cross device. Ensure you're now using the updated script on your website.
<script src="https://[CDN LOCATION]/consent/[YOUR DOMAIN ID]/otSDKStub.js"  type="text/javascript" charset="UTF-8" data-domain-script="[YOUR DOMAIN ID]" ></script>
<script type="text/javascript">
function OptanonWrapper() { }
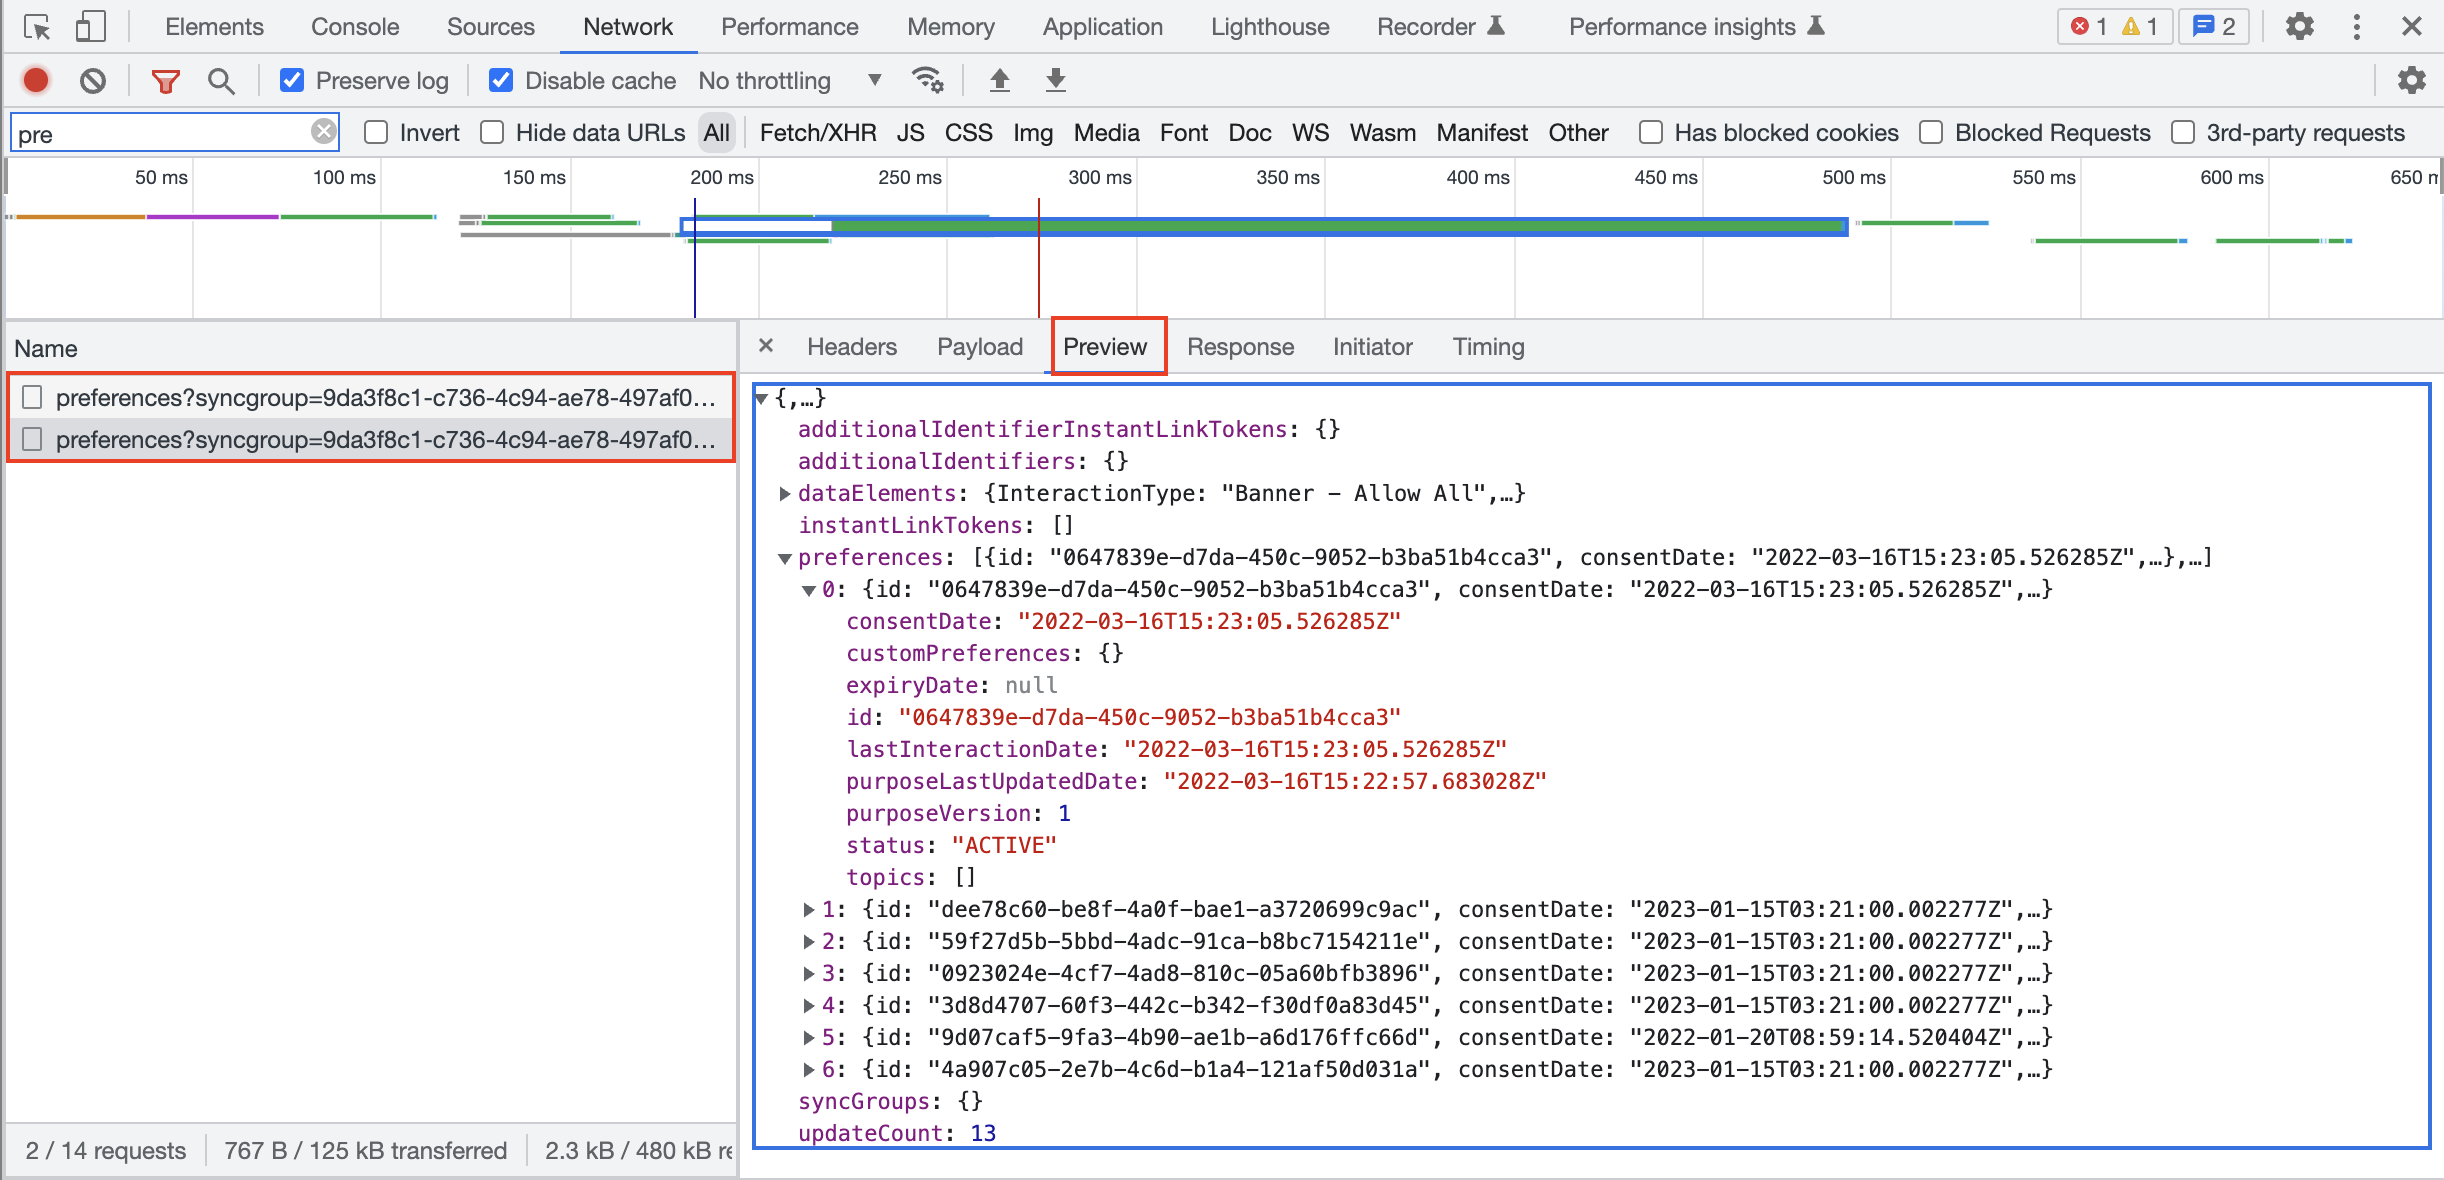
</script>- While implementing on your site, you can inspect the network calls and verify the cross domain/cross device calls are being made. You should see
https://consent-api.onetrust.com/v1/preferences?syncgroup=in the list.

- The following API can be used to get user consent preferences Get Preferences
API Response codes
| Code | Message | Description |
|---|---|---|
| 200 | Success | Response body contains a list of preferences with the current consent status for a data subject. |
| 204 | No Content | Cross domain/device not in use |
| 304 | Failure | "not necessarily a failure" Consent has not been modified ( E-tag response matching) |
| 401 | Failure/ Unauthorised access | Profile is not returned or a parameter is passed incorrectly in JWT or formatting is incorrect |
Mobile App Setup
- Identify the user. This can be done using your existing authentication methods.
- Configure the cross device methods in the SDK.
Android
// Define the Profile Sync Params
OTProfileSyncParams otProfileSyncParams = OTProfileSyncParams.OTProfileSyncParamsBuilder.newInstance()
  .setSyncProfile("true")
  .setSyncProfileAuth("[Insert JWT Token Here]")
  .setIdentifier("[Insert User ID Here]")
  .build();

// Define OT SDK Params and pass the Profile Sync Params reference
OTSdkParams sdkParams = OTSdkParams.SdkParamsBuilder.newInstance()
  .setProfileSyncParams(otProfileSyncParams)
  .shouldCreateProfile("true")
  .build();

// Initialize the SDK
otPublishersHeadlessSDK.startSDK(
  "[Insert CDN Location Here]",
  "[Insert App Id]",
  "[Insert Language Code Here]",
  sdkParams
)

// Profile syncing will happen on completion of the startSDK call
Upon logout, setIdentifier() must be set to an empty string to reset the known user ID to an anonymous state and revert user consents to their default values. All other parameters can be safely discarded.
OTProfileSyncParams.OTProfileSyncParamsBuilder.newInstance()
	.setIdentifier("")

OTProfileSyncParams otProfileSyncParams = otProfileSyncParamsBuilder.build();
iOS
// Define the Profile Sync Params
let profileSyncParams = OTProfileSyncParams()
profileSyncParams.setSyncProfile("true")
profileSyncParams.setSyncProfileAuth("[Insert JWT Token Here]")
profileSyncParams.setIdentifier("[Insert User ID Here]")


// Define OT SDK Params and pass the Profile Sync Params reference
let sdkParams = OTSdkParams()
sdkParams.setProfileSyncParams(profileSyncParams)
sdkParams.setShouldCreateProfile("true")

// Initialize the SDK
OTPublishersHeadlessSDK.shared.startSDK(
  "[Insert CDN Location Here]",
  "[Insert App Id]",
  "[Insert Language Code Here]",
  sdkParams
)

// Profile syncing will happen on completion of the startSDK call- The following API can be used to get user consent preferences Get Preferences
API Response codes
| Code | Message | Description |
|---|---|---|
| 200 | Success | Response body contains a list of preferences with the current consent status for a data subject. |
| 204 | No Content | Cross domain/device not in use |
| 304 | Failure | "not necessarily a failure" Consent has not been modified ( E-tag response matching) |
| 401 | Failure/ Unauthorised access | Profile is not returned or a parameter is passed incorrectly in JWT or formatting is incorrect |
Override Server Consent
This section is specific to determining the behavior when the user is moving from anonymous to a known state.
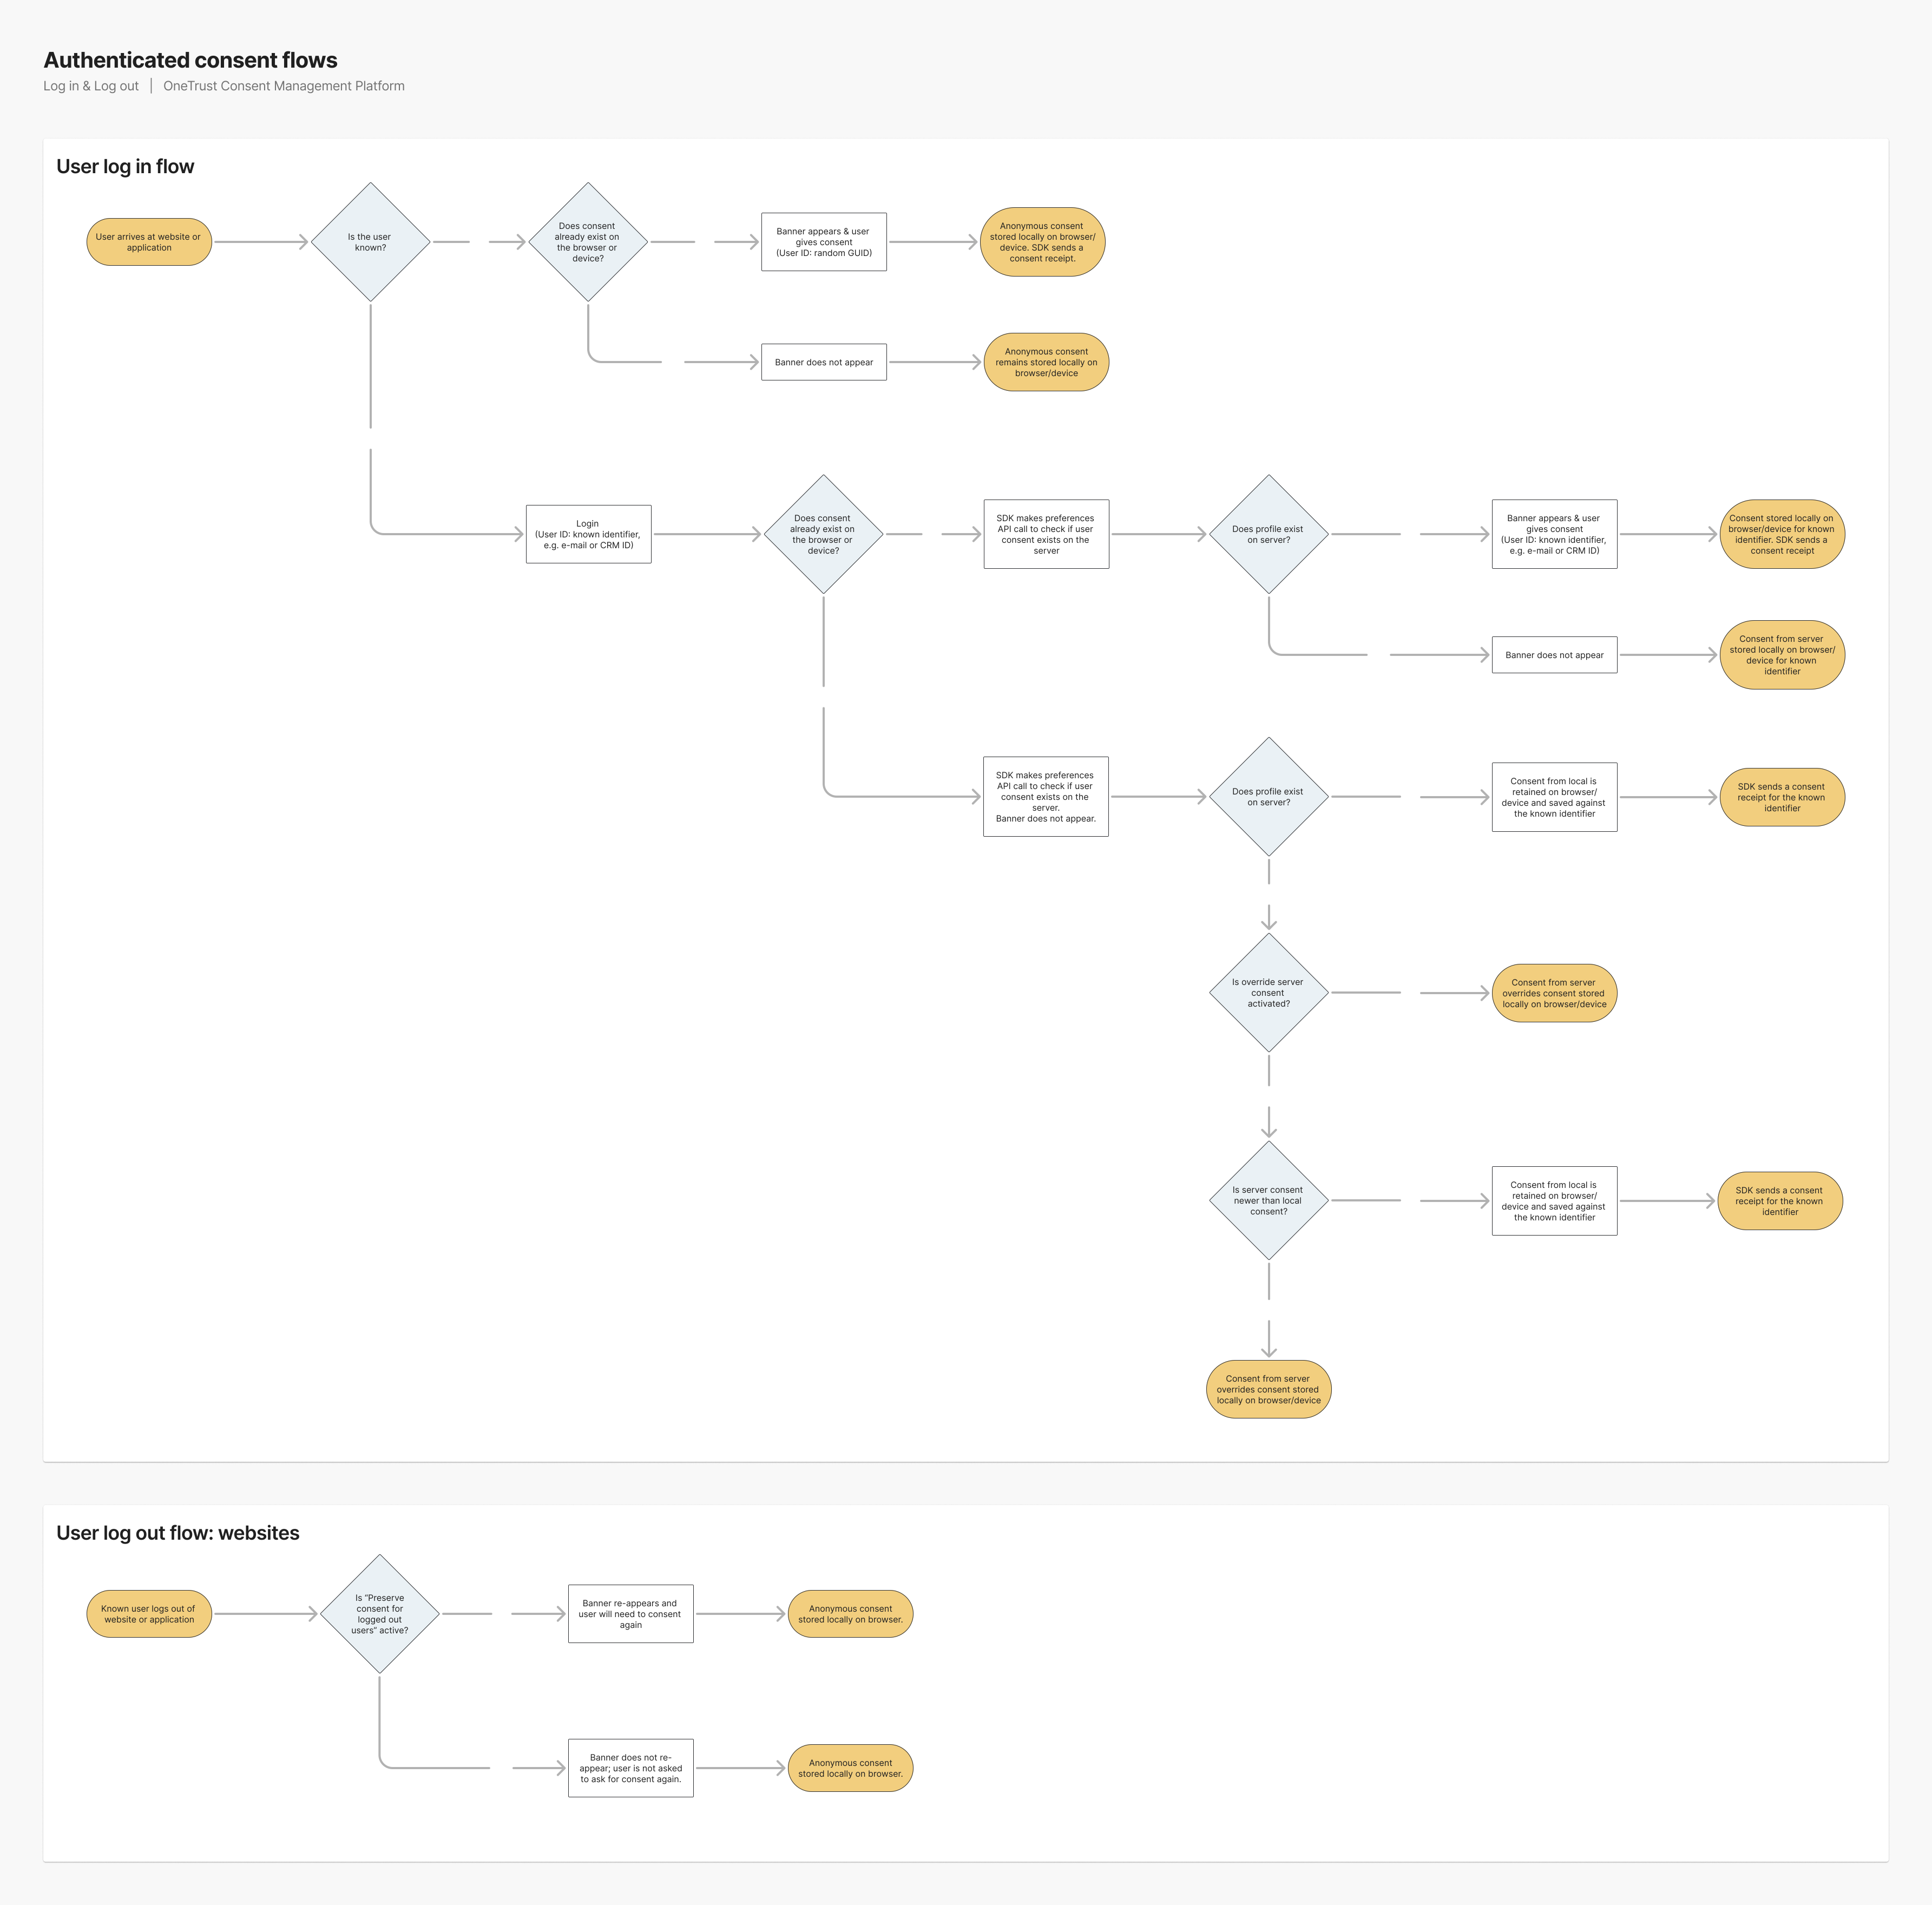
When implementing Cross Domain/Cross Device Consent, profile syncing behaviors can change depending on the status of the Override server consent when unknown users log in toggle which can be found within the OneTrust platform under Consent Groups -> Settings.
There are 4 possible journeys depending on the state of the aforementioned toggle:
Override server consent --> OFF
If a user profile DOES exist on OT servers, the profile will be downloaded and anonymous consent is overwritten.
Override server consent --> OFF
If a user profile DOES NOT exist on OT servers, the user's anonymous consent will be converted to a new profile.
Override server consent --> ON
If a user profile DOES exist on OT servers, the latest/most recent consent will persist. For example, if consent given anonymously (before login) is the latest consent (in terms of the time stamp), it will be retained/persisted instead of the existing server consent. If the existing server consent time stamp is the latest, then the server consent will override consent stored locally on the browser/device.
Override server consent --> ON
If a user profile DOES NOT exist on OT servers, the user's anonymous consent will be converted to a new profile.
Refer to the diagram below for more detail:

Updated 2 months ago