Shopify
Cookie Consent Integration with Shopify
If you use Shopify to manage your website, you can use the OneTrust Shopify application to add the OneTrust CMP to Storefront and Checkout.
You must have both a OneTrust account and a Shopify account to utilize this integration.
Install the OneTrust Shopify app
- Install the OneTrust CMP from Shopify's app store.
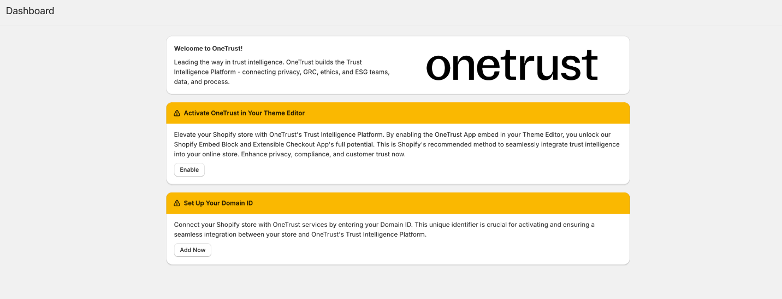
- Click the Enable button under Activate OneTrust in Your Theme Editor.
- Click the Add Now button under Set Up Your Domain ID. You will be redirected to the Settings section of the OneTrust app. Enter your OneTrust Domain ID and click Connect.
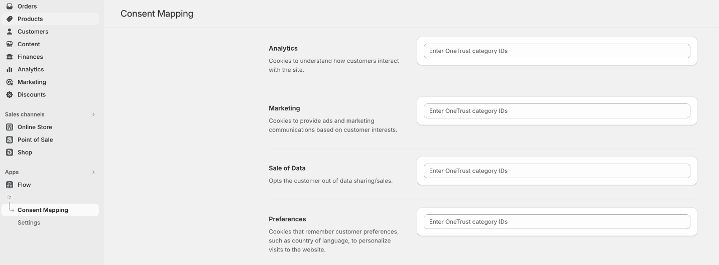
- Navigate to Consent Mapping and map OneTrust category IDs to Shopify's categories. This will allow us to map OneTrust consents to Shopify's Privacy API.
Add the OneTrust CMP to Checkout
A Shopify Plus plan is required to add a OneTrust Cookie Consent integration to a Shopify website Checkout.
As Shopify does not allow third-party libraries to execute JavaScript or manipulate the HTML/DOM on the Checkout pages due to privacy and security concerns, our standard mechanism to store consent (i.e. OptanonConsent or OnetrustActiveGroups) along with other CMP logic cannot be employed as usual. As such, OneTrust has developed additional functionality to allow user consent to be communicated between the Storefront and Checkout pages. To utilize this consent functionality in the Checkout page, please follow these steps:
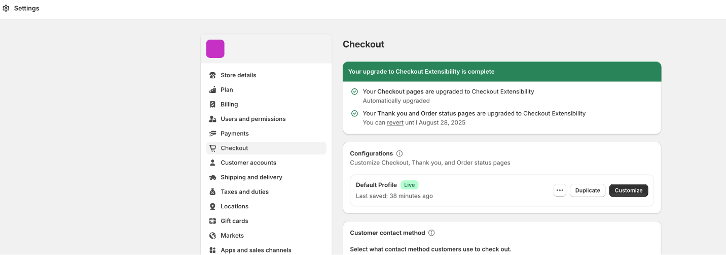
To add OneTrust to your Checkout pages, navigate to Shopify's Settings page.
- Select Checkout in the sidebar menu.
- On the Configurations section, click Customize.
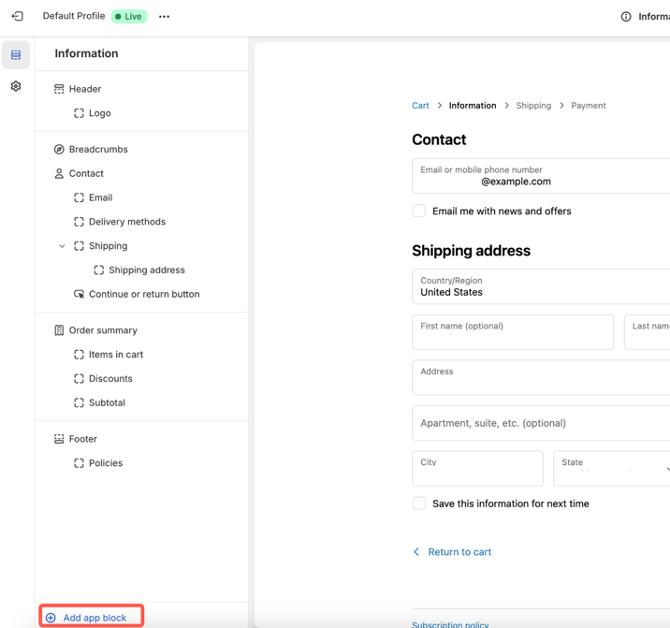
- Click Add app block.
- Select consent-management-checkout from the available blocks.
- Click Save.
Your OneTrust installation is complete. The CMP should now be available in both Storefront and Checkout.
OneTrust CMP UI and Consent
If the user does not interact with or dismiss the OneTrust CMP Banner on Storefront pages (when shown), the banner will reappear on the Checkout page. However, if the user has already dismissed it on Storefront, it will not be shown again during Checkout.
Since JavaScript cannot be executed in the Checkout environment, the CMP UI is rendered using Shopify’s native UI components. Specifically, we use the <Sheet> component from Shopify’s Checkout UI Extensions API. While the content is sourced from your OneTrust configuration, the visual styling is constrained by Shopify’s component library.
Please note the following limitations:
- Styling Restrictions: Custom styles defined in your OneTrust template, such as button colors, may not be fully supported or rendered in the Checkout UI.
- Close Button Behavior: The close (×) button is part of Shopify’s default UI and cannot be removed or customized, as Shopify does not expose any method to disable or hide it.
- HTML Elements: Shopify’s UI library does not interpret raw HTML elements. As a result, any inline HTML tags included in your OneTrust template’s title or description will be displayed as plain text in the Checkout CMP UI.
Once the user interacts with and dismisses the CMP Banner in Checkout, their consent preferences will be persisted and reflected back on the Storefront pages. OneTrust uses Shopify's Privacy APIs to persist consent between Storefront and Checkout.
Actioning Consent and Cookie Blocking
There are multiple ways to block cookies on your site depending on the method you used to install them. Here are our recommendations based on each installation method:
Shopify app store
For any libraries installed through the Shopify app store, there are two methods of cookie blocking you can employ.
Shopify Privacy API
OneTrust updates Shopify’s Privacy API values based on the user's interaction with the CMP. These updates will correspond with the 'Consent Mapping' configuration in step 4 of your OneTrust installation above.
App store libraries can then access these Privacy API values and ideally take responsibility to action the consent and restrict processing if opted out. You can access these consent values with Shopify's public method: Shopify.customerPrivacy.currentVisitorConsent()
Example response:
//opted in
{marketing: 'yes', analytics: 'yes', preferences: 'yes', sale_of_data: 'yes'}

//opted out
{marketing: 'no', analytics: 'no', preferences: 'no', sale_of_data: 'no'}

//consent not yet provided
{marketing: '', analytics: '', preferences: '', sale_of_data: ''}
For example, if you are using the Google & YouTube library, Google events will fire/not fire based on consent given via the CMP without introducing any specific OneTrust blocking methods. Additionally, Shopify's own first party cookies remove themselves from the browser if consent is opted out.
OneTrust AutoBlocking
If your Shopify libraries are not actioning consent themselves as expected and further blocking needs to be done, the recommendation is to use OneTrust AutoBlocking.
To utilize AutoBlocking, you have to add the
AutoBlockingscript to your liquid files. You can find this script in your OneTrust tenant under Scripts > Your Domain > Test/Production Script. We recommend appending it as far up in your<head>as possible as this script must be available before the main OneTrust script is loaded.
<script type="text/javascript" src="https://cdn.cookielaw.org/consent/yourDomainID/OtAutoBlock.js" ></script>Liquid files
For any libraries added through liquid files like theme.liquid, we recommend using our Client-Side Cookie Management approaches like JavaScript Type Re-Writing or OneTrust Auto-Blocking™.
If you plan to use you plan to use the OptanonWrapper function for consent handling, you will have to add the function itself into your liquid files.
<script type="text/javascript">
  function OptanonWrapper() {code here}
</script>To utilize AutoBlocking, you have to add the AutoBlocking script to your liquid files. You can find this script in your OneTrust tenant under Scripts > Your Domain > Test/Production Script. We recommend appending it as far up in your
<head>as possible as this script must be available before the main OneTrust script is loaded.
<script type="text/javascript" src="https://cdn.cookielaw.org/consent/yourDomainID/OtAutoBlock.js" ></script>Custom pixel
For any libraries added as a custom pixel (under Customer Events), we recommend retrieving consent status from the OptanonConsent cookie or the OnetrustActiveGroups data layer variable and write some custom logic to block the scripts/cookies from firing if opted out.
OneTrust blocking approaches like JavaScript Type Re-Writing or AutoBlocking can not be used as custom pixels are added as iFrames which prevent some OneTrust functions from working as expected. As such, we recommend using the two approaches above to load and block cookies before using the custom pixel approach if needed.
Headless support
OneTrust supports headless Shopify storefront implementations, but the setup differs based on the storefront architecture. This section covers Hydrogen implementations and custom headless storefronts.
Hydrogen
If your Shopify site uses Hydrogen, this section walks through how to integrate the OneTrust Web CMP with your Hydrogen storefront and keep consent in sync with Shopify’s Customer Privacy API.
- Create a new Hydrogen project
Before proceeding, make sure you have created one if you have not already. Follow the CLI to scaffold your Hydrogen storefront.
npm create @shopify/hydrogen@latest- Update environment variables
Create or update your .env file with the following:
# Hydrogen/Shopify connection
SESSION_SECRET=foobar
PUBLIC_STOREFRONT_ID=75837243628
PUBLIC_STOREFRONT_API_TOKEN=3e785553116242619cf1177dabb0ab8c
PUBLIC_STOREFRONT_API_VERSION=2025-01-5
PUBLIC_STORE_DOMAIN=ot-test-first.myshopify.com
PUBLIC_CHECKOUT_DOMAIN=ot-test-first.myshopify.com
PRIVATE_STOREFRONT_API_TOKEN=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
PUBLIC_CUSTOMER_ACCOUNT_API_CLIENT_ID=807d0c93cbbc1d675024952401b6362e
PUBLIC_CUSTOMER_ACCOUNT_API_URL=https://shopify.customer-accounts.com

# OneTrust SDK
VITE_PUBLIC_ONETRUST_SDK_URL=https://cookie-cdn.1trust.app/scripttemplates/otSDKStub.js
VITE_PUBLIC_ONETRUST_DATA_DOMAIN=f2c79290-1100-4287-9455-26e0758ebd6b-test
VITE_PUBLIC_ONETRUST_SDK_ID=OneTrustConsentBanner
This helps you to connect your Hydrogen with your Shopify account. Make sure to prefix OneTrust-related keys with VITE_ to expose them to the client.
- Modify the root.tsx
Wrap your layout with the Hydrogen Analytics.Provider and render the OneTrust consent logic component:
return (
  <Analytics.Provider
    cart={data.cart}
    shop={data.shop}
    consent={data.consent}
  >
    <OneTrustConsentWithURL />
    <Outlet />
  </Analytics.Provider>
);- Create the OneTrustConsentWithURL.tsx
Place this in your components or routes folder.
import {
    useAnalytics,
    useLoadScript,
} from '@shopify/hydrogen';
import { useEffect, useCallback, useRef } from 'react';

const { VITE_PUBLIC_ONETRUST_SDK_URL, VITE_PUBLIC_ONETRUST_DATA_DOMAIN, VITE_PUBLIC_ONETRUST_SDK_ID} = import.meta.env;

declare global {
    interface Window {
        OneTrust: {
            ActiveGroups?: string;
            OnConsentChanged?: (callback: () => void) => void;
        };
        OptanonActiveGroups: string;
    }
}

export function OneTrustConsentWithURL() {
    const { register, customerPrivacy } = useAnalytics();
    const { ready } = register('OneTrustConsentWithURL');
    const prevGroups = useRef('');
    const oneTrustConsentStatus = useLoadScript(
        VITE_PUBLIC_ONETRUST_SDK_URL,
        {
            in: 'head',
            attributes: {
                id: VITE_PUBLIC_ONETRUST_SDK_ID,
                type: 'text/javascript',
                'data-domain-script': VITE_PUBLIC_ONETRUST_DATA_DOMAIN,
                charset: 'UTF-8',
            },
        },
    );

  useEffect(() => {
      const inlineScript = document.createElement('script');
      inlineScript.type = 'text/javascript';
      inlineScript.innerHTML = `
        function OptanonWrapper() {
          console.log("✅ OptanonWrapper called by OneTrust.");
          // You can trigger syncing or custom logic here if needed
        }
      `;
      document.head.appendChild(inlineScript);
    }, []);
    const oneTrustSync = useCallback(() => {
        if (!customerPrivacy || !customerPrivacy?.setTrackingConsent) {
            return;
        }
        // @ts-ignore
        window.customerPrivacy = customerPrivacy;
        const activeGroups = window.OptanonActiveGroups;
        console.log('OneTrust Active Groups: ', activeGroups);
        const trackingConsent = {
            marketing: true,
            analytics: true,
            preferences: true,
            sale_of_data: true,
        };
        // Important for running project on localhost. If not passes, tracking_consnet wont drop.
        const devParameters = {
            headlessStorefront: true,
            storefrontRootDomain: 'localhost'
        };
        //new method
        customerPrivacy?.setTrackingConsent({
            ...trackingConsent,
            // @ts-ignore
            // This is for development purpose only, remove on production
            ...devParameters
          }, (ev) => {
            console.log('%c[OneTrust Sync]%c Consent data set', 'color: white; background-color: green; padding: 2px 4px; border-radius: 3px', 'color: white');
        });


    }, [customerPrivacy, ready]);

    useEffect(() => {
        console.log('🔴: OneTrust consent status:', oneTrustConsentStatus);
        if (oneTrustConsentStatus !== 'done') return;

        const interval = setInterval(() => {
            const currentGroups = window.OptanonActiveGroups;
            if (currentGroups && currentGroups !== prevGroups.current) {
                prevGroups.current = currentGroups;
                oneTrustSync();
            }
        }, 500); // check every 500ms (adjust as needed)
        return () => {
            clearInterval(interval);
        };
    }, [oneTrustConsentStatus, oneTrustSync]);
    return null;
}
After completing the changes, load the page and see if the _tracking_consent cookies are dropping with the correct status in the browser dev tool > cookies.
You have now completed the configuration steps. Your Hydrogen storefront now does the following:
- It loads OneTrust SDK on every page.
- It listens for consent changes.
- It maps consent categories to Shopify’s CustomerPrivacy API.
Custom headless support
The OneTrust Shopify extension relies on a Liquid theme app extension to automatically inject the required storefront-consent.js and OneTrust CMP libraries. If your site uses a custom headless storefront that does not use Shopify theme rendering, that automatic injection does not occur.
In cases where your site does not use Liquid themes, the OneTrust CMP and the storefront-consent libraries must be manually added to the <head> section of your headless storefront.
Why this matters
If the storefront-consent sync script is missing, the checkout extension cannot detect that consent was already captured on the storefront, which can cause the consent banner to reappear during checkout.
Required setup for custom headless storefronts
For custom headless storefronts, add the following scripts to the <head> of the storefront app.
- Add the OneTrust Web CMP script:
<script
  id="onetrust-script"
  src="https://{YOUR_CDN}/scripttemplates/otSDKStub.js"
  type="text/javascript"
  charset="UTF-8"
  data-domain-script="{YOUR_DOMAIN_ID}"
  data-shopify-consent-mapping='{YOUR_CONSENT_MAPPING_JSON}'>
</script>{YOUR_CDN}and{YOUR_DOMAIN_ID}should match the values configured in the OneTrust app settings in Shopify admin and the OneTrust tenant.{YOUR_CONSENT_MAPPING_JSON}is the consent category mapping configured in the OneTrust Shopify app.- The
id="onetrust-script"attribute is required because the storefront-consent.js sync script reads that element to access the consent mapping configuration.
Sample reference:
<script
    id="onetrust-script"
    src="https://cdn.cookielaw.org/scripttemplates/otSDKStub.js"
    type="text/javascript"
    charset="UTF-8"
    data-domain-script="0195hfh-ag85-1234-8600-012323232323-test"
    data-shopify-consent-mapping='{
        "analytics":["C0002"],
        "marketing":["C0004"],
        "preferences":["C0003"],
        "sale_of_data":["C0004"]
    }'>
</script>- Add the storefront consent sync script:
<script src="{STOREFRONT_CONSENT_JS_URL}"></script>{STOREFRONT_CONSENT_JS_URL}is the CDN URL for the storefront-consent.js asset exposed by the Shopify extension. Sample reference:https://cdn.shopify.com/extensions/<extension-id>/<version>/assets/storefront-consent.js
What these scripts do
This is the standard approach for headless Shopify storefronts where theme extensions cannot be used.
These scripts are responsible for loading the OneTrust CMP on the storefront and syncing consent decisions to Shopify's Customer Privacy API (setTrackingConsent) so checkout can receive the correct consent state.
Without this setup, consent captured on the storefront may not be recognized during checkout, which can cause the banner to reappear.
Shopify and the OneTrust Script
Last Updated: Oct 26, 2021
If you use Shopify to manage your website, you can add the script to your theme header, along with the scripts for tag managers your organization uses.
Integration Steps
-
Open your Shopify account.
-
On the main navigation menu, select Online Store > Themes.
-
On your current theme, hover over the Actions button. Then select Edit code. The code editor appears.
-
Under Layout, select theme.liquid.
-
In the
<head>section of the code, paste the script.
For the integration to work, you must have a published script. For information on how to publish a script, see Getting Started with Cookie Compliance.
- Click the Save button.
Blocking Shopify Server-side Cookies
Below is an example of how you can use the OneTrust OptanonWrapper() callback to pass through consent values to Shopify Privacy API. For more information, see Using the OptanonWrapper Callback Function.
You can rename the performanceCookieCategory variable and change the value based on cookie category IDs. When renaming, make sure the value is updated based on the consent you want to associate with the Shopify API.
If you rename the
performanceCookieCategoryvariable, you must rename the variable anywhere it's referenced.
<script>

const performanceCookieCategory = 'C0002,';

function waitForOneTrust() {
  hasOneTrustLoaded();
  let attempts = 0;
  const interval = setInterval(function () {
    if (hasOneTrustLoaded() || attempts > 100){
      clearInterval(interval);
    }
    attempts++;
  }, 100)
}

function hasOneTrustLoaded() {
  if (typeof window.OnetrustActiveGroups === 'string') {
    //check now
    optanonWrapper()
    // and wrap and trigger after cookie opt-in
    window.OptanonWrapper = optanonWrapper;
    return true;
  }
  return false;
}

function sendConsent(trackingConsent) {
  window.Shopify.customerPrivacy.setTrackingConsent(trackingConsent, () => {
    console.log('Happy Days')
  });
}

function optanonWrapper() {
  const trackingConsent = !!window.OnetrustActiveGroups.includes(performanceCookieCategory);       window.Shopify.loadFeatures(
    [
      {
        name: 'consent-tracking-api',
        version: '0.1',
      },
    ],
    error => {
      if (error) {
        throw error;
      }
      sendConsent(trackingConsent)
    },
  );
}

(function () {
  waitForOneTrust();
})();

</script>
Updated 4 days ago