React Native
The OneTrust React Native library is hosted on NPM.
Our mobile app scanner can perform scans of your iOS and Android apps using React Native. However, it will only fetch iOS/Android libraries. React Native libraries are not supported.
A new, rearchitected version of the React Native library has been released as of 202512.1.0, compatible with React Native 0.76 and later. For more information, see OneTrust Next Generation CMP SDKs.
All methods remain the same.
Versioning and Installation
Versioning
The SDK version used in the app must match the version of the app data published from your OneTrust tenant. For example, if you've published version 202408.1.0 of the app data in your OneTrust environment, you must use npm package version 202408.1.0 as well. It is recommended to specify a version to avoid automatic updates, as a OneTrust publish is typically required when you update your SDK version.
As of 202403.1.3, our React Native package supports tvOS.
Note: OneTrust ATT prompts are not supported today.
Installation
Example:
$ npm install [email protected]
$ cd ios && pod install
Android requirements
Ensure that the application supports RTL. Simply add android:supportsRtl="true" to the <application> element in your Android Manifest file.
Resolving Dependency Clashes in Android
The underling OneTrust Native SDK relies on a number of transitive dependencies to operate. If your app does not include these already, they'll be added by the OneTrust package. If they do already exist in your application, there may be a clash between the versions OneTrust requires and the versions your application is using. Add the below to the dependencies section of your :app Build.gradle file. Uncomment any transitive dependency that you would like to exclude, or uncomment the last line to exclude all transitive dependencies.
If your application excludes a dependency, it must be added elsewhere in your application.
implementation(project(":react-native-onetrust-cmp")){
//Uncomment any group that you'd like to exclude
//        exclude group: 'androidx.appcompat'
//        exclude group: 'androidx.constraintlayout'
//        exclude group: 'com.google.android.material'
//        exclude group: 'androidx.work'
//        exclude group: 'androidx.browser'
//        exclude group: 'com.github.bumptech.glide'
//        exclude group: 'com.squareup.retrofit2'

//Uncomment the next line to exclude all dependencies
//        transitive = false
}
Implementation and Development
The following sections are laid in in a typical order of development and UX.
Initializing the SDK
The OneTrust SDK retrieves an object that contains all the data needed to present a UI to a user to collect consent for the application. The data returned is determined by the configurations made in the OneTrust admin console.
Before proceeding, make sure that your SDK Data has been published inside of the OneTrust Admin Portal. If the data has not been published, the SDK will not have any data to retrieve. View instructions on how to publish here.
startSDK
startSDKThis method is the initialization method for the SDK. It makes between 1-2 network calls:
- 1 network call when using a non-IAB TCF template
- 2 networks calls when using a IAB TCF template
OTPublishersNativeSDK.startSDK(
  'storageLocation',
  'domainIdentifier',
  'languageCode',
  {
    androidUXParams: uxParamsJSON, //remove if not applicable
    countryCode: 'IN', //remove if not applicable
    enableDarkMode: 'true', //remove if not applicable
    profileSyncParams: syncParams,//remove if not applicable
    sdkVersion: '202409.1.0', //remove unless explicitly and intentionally overriding the sdk version. do not use in production.
    alwaysOpenUrlsInBrowser: true //remove if not applicable, available to use starting 202604.2.0
  },
  true,
)
  .then((responseObject) => {
    console.info(`Download status is ${responseObject.status}`);
    // get full JSON object from responseObject.responseString
  })
  .catch((error) => {
    console.error(`OneTrust download failed with error ${error}`);
});| Argument | Type | Description |
|---|---|---|
| storageLocation | String | The CDN location for the JSON that the SDK fetches. (Usually, but not always, cdn.cookielaw.org. |
| domainIdentifier | String | The App ID to load |
| languageCode | String | 2-digit or 4-digit (in the case of advanced languages) ISO language code used to return content in a specific language. Note: Any language code format which is not listed in OneTrust environment will be considered as invalid input. Note: If the languageCode passed by your application is valid, but does not match with a language configuration for your template, then the SDK will return content in the default language configured in OneTrust environment (usually, but not always, English). |
| params | Dictionary | Dictionary of parameters to override initialization settings. Parameters are optional, but you must have a non-null object defined, even if it is blank. See params section below for more information. |
| autoShowBanner | Boolean | Automatically display the banner UI when download has completed successfully. This follows the shouldShowBanner() logic to ensure the user should be presented with a banner. autoShowBanner defaults to false.If autoShowBanner is set to true and shouldShowBanner() logic returns true, the method for showBannerUI() will be called automatically and the user will see the Banner UI. You will not need to separately call showBannerUI() as this is taken care of by the autoShowBanner logic. |
| alwaysOpenUrlsInBrowser | Boolean | Forces policy URLs to open in an external browser, bypassing Deep Linking interception that may cause links to open behind the SDK UI. Note: This parameter is available starting 202604.2.0 |
Params
All values below are optional.
| Key | Value | Description |
|---|---|---|
countryCode | ISO country code | Overrides the geolocation of the user |
regionCode | ISO region code | Overrides the geolocation of the user, used in conjunction with countryCode |
androidUXParams | JSON String | Sets UI/UX overrides for Android (see Custom Styling section below) |
profileSyncParams | Dictionary | Allows for cross-device syncing of consent preferences. See Cross-Device Consent below. |
Cross Device Consent
Cross-Device Consent is an optional feature. The parameters below are not required for initializing the SDK. Each of the parameters are required to sync the user's consent profile.
const syncParams = {
    identifier: '[email protected]',
    syncProfileAuth: 'eyJhbGci...',
  };

const startSDKParams = {profileSyncParams:syncParams}| Key | Type | Description |
|---|---|---|
| identifier | String | User identifier |
| syncProfileAuth | String | JWT auth token required to retrieve a user profile |
Display User Interfaces
The OneTrust SDK manages several different user interfaces to display to a user. Here's a list below for your reference:
| Name | Description | Method to Show |
|---|---|---|
| Banner | Notice to the user of their privacy rights. Has configurable text and buttons for Accept All, Reject All, Manage Preferences, and Close Banner. Note: Each of these buttons can be toggled On/Off in the Admin Console. | showBannerUI() |
| Preference Center | An interface for the user to view their current profile settings and update their choices based on the configuration provided for them. Has configurable text and buttons for Accept All, Reject All, Save Settings, and Close Preference Center. Note: You can choose to hide each button except Save Settings - this is required for a User to update their choices. | showPreferenceCenterUI() |
| Purpose Details | The Purpose Details (or Category Details) view shows granular detail about the category and also shows the SDK LIst link, Vendor List link, and child categories based on configuration. | none, sub-view of Preference Center |
| SDK List | An interface to show a granular list of SDKs to the user. This list may be filtered by Category to provide more transparency to the User. Note: This can be hidden in Template Settings in the Admin Console. | none, sub-view of Preference Center |
| IAB Vendor List | An interface, shown only for IAB2 type templates. Displays a list of 3rd party ad tech vendors under management by the application. This provides a way for users to opt in/out of consent for a particular vendor. | none, sub-view of Preference Center |
| Vendor Details | A child interface of Vendor List, this view shows more granular information about a vendor and its Purpose, Legitimate Interest, Special Feature, and Special Purpose settings. | none, sub-view of Preference Center |
The user interfaces without methods indicate they can only be navigated to based on user navigation and admin portal settings.
showBannerUI
showBannerUIThis method will always show the Banner UI, regardless of the shouldShowBanner value.
OTPublishersNativeSDK.showBannerUI()showPreferenceCenterUI
showPreferenceCenterUIThis method will always show the Preference Center UI.
OTPublishersNativeSDK.showPreferenceCenterUI()shouldShowBanner
shouldShowBannerThis method determines if a Banner UI should be displayed based on SDK determined logic.
OTPublishersNativeSDK.shouldShowBanner().then((result) =>
console.log('Should the banner be shown? ', result),
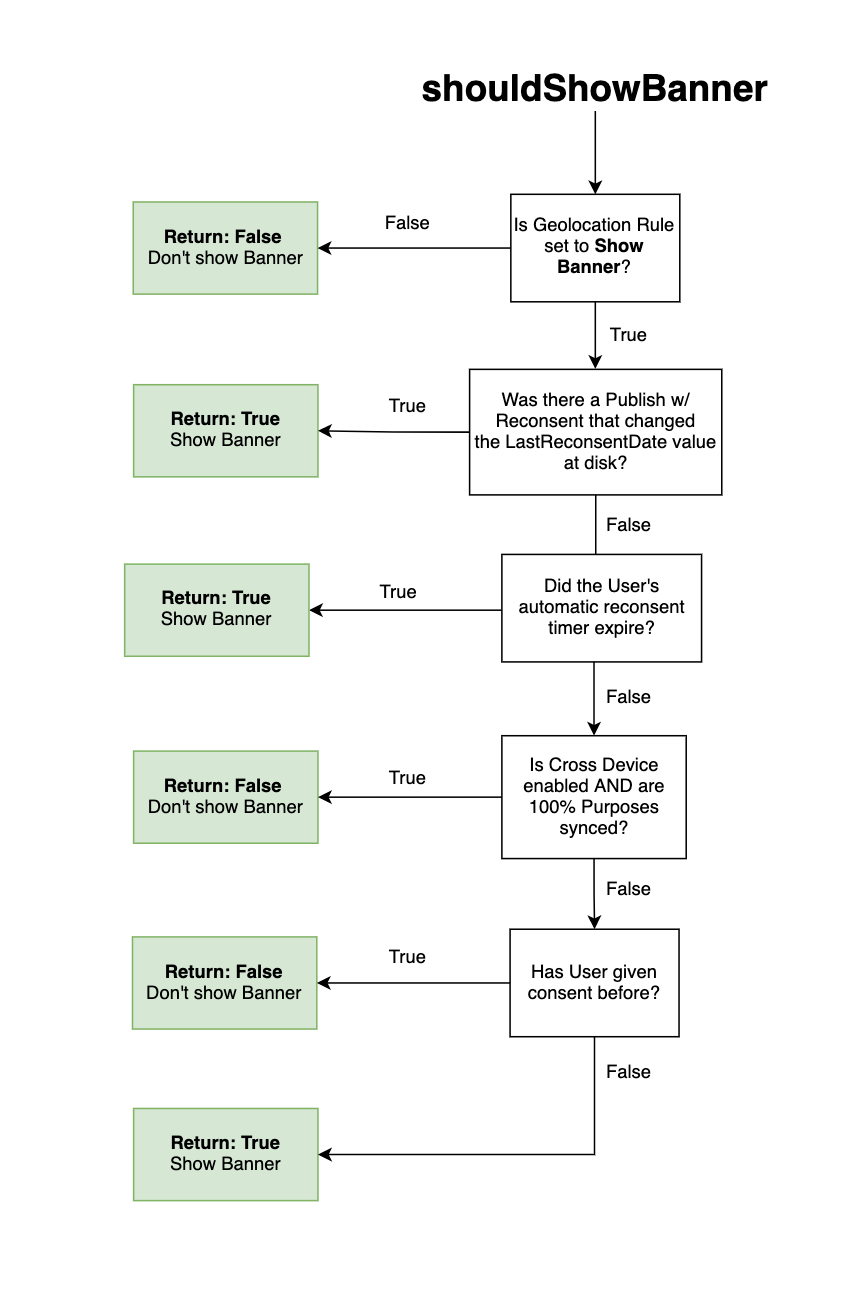
);How is shouldShowBanner() computed?
-
Is the geolocation rule configured to show a banner? This is controlled by the
showAlertNoticeproperty in the JSON beingtrue.- If
showAlertNotice = false, the method returnsfalseand a banner should not be shown for this region. - If
showAlertNotice = true, move to the next check.
- If
-
Was the most recent SDK Publish configured to re-consent users? This is controlled by the presence of 2 values. 1) A
LastReconsentDateproperty in JSON with non-null value. 2) AOneTrustLastReconsentDatevalue saved on disk- If the
LastReconsentDateJSON is newer than theOneTrustLastReconsentDateon disk, the method returnstrueand a banner should be shown. - If no, move to the next check
- If the
-
Is the geolocation rule configured for automatic re-consent AND did the user's automatic re-consent timer expire? This is controlled by measuring the difference between
OneTrustLastConsentDatesaved on disk and theCurrent Dateand seeing if it is greater than or equal toOneTrustReconsentFrequencyDaysin the JSON saved on disk. The SDK considers the date itself and not the time consent was given. For example, if the re-consent period is set to 1 day in my geolocation rule and the user provides consent at 11:59pm GMT, the banner will reappear at 12:00am GMT (1 minute later, but the next day).- If yes, the method returns
trueand a banner should be shown. - If no, move to the next check
- If yes, the method returns
-
Is Cross Device Consent enabled and were 100% of Purposes synced? This is controlled by the
profile.sync.allPurposesUpdatedAfterSyncproperty in JSON beingtrue.- If yes, the method returns
falseand a banner should not be shown. This is because each of the Categories/Purposes managed by the SDK were 100% synced from the user's profile on the OneTrust server. - If no, move to the next check.
- If yes, the method returns
-
Is Cross Device Consent enabled and is the user being exposed to new Categories/Purposes since the last time their consent was saved? This would only occur if Cross Device Consent is enabled and there was a new publish to the SDK which exposes new Categories/Purposes that have at least 1 SDK assigned to it.
- If yes, the method returns
trueand a banner should be shown. - If no, move to the next check.
- If yes, the method returns
-
Has the user previously given consent and is that consent stored at disk?
- If yes, the method returns
falseand a banner should not be shown. - If no, the method returns
trueand a banner should be shown because this is the first time they are being asked to give consent on the app.
- If yes, the method returns
-
Has a new category been added post giving consent?
- If yes, the method returns
trueand a banner should be shown again because user needs to give consent to the new category. - If no, the method returns
falseand a banner should not be shown.
- If yes, the method returns
When Consent Changes
When a user updates their consent choices or interacts with a OT SDK UI, the Application needs to become aware of that so it can control the next set of actions like:
- Allowing or Restricting processing of 3rd party SDKs based on their categorization
- Passing latest User consent values to 3rd Party SDKs
- Passing the IAB’s encoded TC String to 3rd party SDKs
- Passing the IAB’s USP String to 3rd Party SDKs
- Routing the User to another location in the App
- Displaying messages to the User of their changes
- Logging updates to internally owned APIs
- etc.
Consent Values
OneTrust universally uses the following values for consent status:
| Consent value | Description |
|---|---|
| 1 | Consent given |
| 0 | Consent not given |
| -1 | Consent not yet gathered, or SDK not initialized |
Detecting User Consent
The SDK provides two options to detect user consent:
- Listening for Broadcast Events
- Querying for User Consent
Recommended Approach:
OneTrust recommends you set up observers for each applicable category/purpose and rely on the SDK broadcasts as the primary method to action on consent. Alternatively, if the app can't set up multiple observers, you can set up a single observer for the OTConsentUpdated event and query for consent.
Listening for Consent Changes
Every time the SDK is initialized or the user's consent changes, it will broadcast an event with the consent status for each Category/Purpose ID and SDK ID. You can use these events and consent values to trigger a subsequent action.
Your app can listen to either the categories/purpose itself or each individual SDK you want to manage. OneTrust recommends setting up observers on the category/purpose level to minimize the amount of observers you have to initialize.
The SDK will broadcast events for always active categories/purposes and SDKs as well.
Use Case: The app needs to know when consent has changed so it can trigger an appropriate action.
Example: When a user opts out of the "Sale of Personal Data" category, set a privacy/opt out flag in the Google Ads SDK so no personalized ads are shown to the user.
On iOS, you must tell the bridge which consent categories and SDK IDs are eligible for broadcast. The code sample below shows an application allowing broadcasts for two categories (CXXXX) and an SDK ID (as a GUID).
OTPublishersNativeSDK.setBroadcastAllowedValues(['C0002','C0003', '4dfa896d-101e-4f0d-8620-a8546aaef187']);The parameters passed are the events the iOS platform will be allowed to emit. This method has a conditional built in so that it will not execute on Android devices.
To start listening for consent changes, call the listenForConsentChanges method, which accepts a Category ID or an SDK ID as a string, and a callback function.
OTPublishersNativeSDK.listenForConsentChanges('C0002', (id, status) =>
  console.log('Consent status for ', id, ' has been updated to ', status),
);
The callback will be executed every time the consent status is updated.
OTConsentUpdated
The SDK will broadcast a generic event upon successful completion of consent logging. Because this process is asynchronous, a short delay may occur between the dispatch of UI Interaction Events and the OTConsentUpdated event.
Note: Notification events for purposes and SDKs are triggered prior to the
OTConsentUpdatedevent. These notifications are broadcast once consent choices are saved locally and do not wait for server-side consent logging confirmation likeOTConsentUpdated. As such, if there is no network connection,OTConsentUpdatedis not broadcast, while the notification events may still fire after the consent choices are saved locally.
Use case: The app needs to know when it can query for the latest consents for vendors, categories, SDKs, etc. This is useful in cases where you do not or cannot set up multiple observers for each category or SDK.
Event name: OTConsentUpdated
OTPublishersNativeSDK.listenForConsentChanges('OTConsentUpdated', () =>
  console.log('Event triggered')
);
To stop listening for changes (for example, when your component is unmounted,) simply call:
OTPublishersNativeSDK.stopListeningForConsentChanges();This will cancel all listeners.
Querying for Consent
Query the current consent status for any of the categories or SDKs included in your application. This can be used to determine what privacy action is needed at app launch or anytime the consent status is needed without being notified by an event broadcast. Simply pass in the Category ID (eg. C0001) or SDK ID and the method will return the current consent status (integer value).
OTPublishersNativeSDK.getConsentStatusForCategory('C0002').then((result) =>
  console.log('Consent Status for category C0002 = ' + result),
);OTPublishersNativeSDK.getConsentStatusForSDKID('06a13b51-81a1-42a6-9121-80b4fc52d859').then((result) =>
console.log('Consent Status for 06a13b51-81a1-42a6-9121-80b4fc52d859 = ' + result),
);Listening for UI Interaction Events
Note: This feature is available starting from the 202511.1.1 SDK release.
UI Interaction Events are only relevant when using the out-of-the-box OneTrust UI. If your app implements a custom UI, you can disregard this section.
We do not recommend using interaction events to handle any consent actioning logic. Interaction
events are triggered after the UI is dismissed but before consent may be updated in local storage.
As a result, querying for consent based off these interactions may return the old consent values
and not updated ones.
When a user interacts with the CMP UI, the SDK sends an interaction event that the application
can listen for.
Use Case: The app needs to trigger certain actions based on interaction with the UI.
Example: User selects the "Confirm My Choices" button on the OT Preference Center UI, which
saves their consent choices. An app might want to listen for the onPreferenceCenterConfirmChoices() to show a success toaster to the user and navigate them to the App's home page.
Types of Events
| Event | Description |
|---|---|
showBanner() | Triggered when the banner is shown |
hideBanner() | Triggered when the banner is closed |
bannerClickedAcceptAll() | Triggered when the user selects allows all on the banner |
bannerClickedRejectAll() | Triggered when the user selects rejects all on the banner |
showPreferenceCenter() | Triggered when the preference center is displayed |
hidePreferenceCenter() | Triggered when the preference center is closed |
preferenceCenterAcceptAll() | Triggered when the user selects allow all on the preference center |
preferenceCenterRejectAll() | Triggered when the user selects reject all on the preference center |
preferenceCenterConfirmChoices() | Triggered when the user selects confirm choices on the preference center |
showVendorList() | Triggered when the vendor list is displayed |
hideVendorList() | Triggered when the vendor list is closed or when back button on the vendor list is selected |
vendorConfirmChoices() | Triggered when the user selects confirm or save choices on the vendor list |
preferenceCenterPurposeConsentChanged() | Triggered when the user updates consent values for a particular OneTrust category on Preference Center UI |
preferenceCenterPurposeLegitimateInterestChanged() | Triggered when the user updates legitimate interest values for a particular IAB purpose on the preference center UI |
allSDKViewsDismissed(String interactionType) | Triggered when all the SDK's views are dismissed from the view hierarchy |
The allSDKViewsDismissed(String interactionType) event is often used as:
- It is the last event to fire when a CMP UI is dismissed
- It only fires once all CMP UIs are dismissed from the view hierarchy
- It passes a
interactionTypeto provide context on the user's action to dismiss the UI
Interaction Type | Description |
|---|---|
bannerAllowAll | The user has selected the accept all button on the banner. |
bannerRejectAll | The user has selected the reject all button on the banner. |
bannerClose | The user has selected the close button on the banner. |
preferenceCenterAllowAll | The user has selected the allow all button on the preference center. |
preferenceCenterRejectAll | The user has selected the reject all button on the preference center. |
preferenceCenterConfirm | The user has selected the confirm button on the preference center. |
preferenceCenterClose | The user has selected the close button on the preference center. |
vendorListConfirm | The user has selected the confirm button on the vendor list. |
Setting Up OneTrust SDK Event Listeners
To properly integrate OneTrust event handling, add all required SDK event listeners as soon as the component mounts, insidecomponentDidMount().
Likewise, remove every listener in componentWillUnmount() to ensure proper cleanup, prevent memory leaks, and avoid duplicate callback registrations.
//OneTrust Event Names

export enum OTEventName {
  showBanner = 'onShowBanner',
  hideBanner = 'onHideBanner',
  bannerClickedAcceptAll = 'onBannerClickedAcceptAll',
  bannerClickedRejectAll = 'onBannerClickedRejectAll',

  showPreferenceCenter = 'onShowPreferenceCenter',
  hidePreferenceCenter = 'onHidePreferenceCenter',
  preferenceCenterAcceptAll = 'onPreferenceCenterAcceptAll',
  preferenceCenterRejectAll = 'onPreferenceCenterRejectAll',
  preferenceCenterConfirmChoices = 'onPreferenceCenterConfirmChoices',

  showVendorList = 'onShowVendorList',
  hideVendorList = 'onHideVendorList',
  vendorConfirmChoices = 'onVendorConfirmChoices',

  allSDKViewsDismissed = 'allSDKViewsDismissed',

  preferenceCenterPurposeConsentChanged = 'onPreferenceCenterPurposeConsentChanged',
  preferenceCenterPurposeLegitimateInterestChanged =
    'onPreferenceCenterPurposeLegitimateInterestChanged'
}
The first call to addEventListener automatically initializes the OneTrust Native Listener
//Subscribing to OneTrust Events

componentDidMount() {
  // Banner events
  this.bannerShowListener = OTPublishersNativeSDK.addEventListener(
    OTEventName.showBanner,
    (reason) => console.log(' Banner shown:', reason)
  );

  this.bannerHideListener = OTPublishersNativeSDK.addEventListener(
    OTEventName.hideBanner,
    () => console.log(' Banner hidden')
  );

  this.bannerAcceptListener = OTPublishersNativeSDK.addEventListener(
    OTEventName.bannerClickedAcceptAll,
    () => console.log(' Banner Accept All clicked')
  );

  this.bannerRejectListener = OTPublishersNativeSDK.addEventListener(
    OTEventName.bannerClickedRejectAll,
    () => console.log(' Banner Reject All clicked')
  );

  // Preference Center events
  this.pcShowListener = OTPublishersNativeSDK.addEventListener(
    OTEventName.showPreferenceCenter,
    () => console.log(' Preference Center shown')
  );

  this.pcHideListener = OTPublishersNativeSDK.addEventListener(
    OTEventName.hidePreferenceCenter,
    () => console.log(' Preference Center hidden')
  );

  this.pcAcceptListener = OTPublishersNativeSDK.addEventListener(
    OTEventName.preferenceCenterAcceptAll,
    () => console.log(' Preference center Accept All clicked')
  );

  this.pcRejectListener = OTPublishersNativeSDK.addEventListener(
    OTEventName.preferenceCenterRejectAll,
    () => console.log(' Preference center Reject All clicked')
  );

  this.pcConfirmListener = OTPublishersNativeSDK.addEventListener(
    OTEventName.preferenceCenterConfirmChoices,
    () => console.log(' Preference center Confirm my Choices clicked')
  );

  // Vendor List events
  this.vendorShowListener = OTPublishersNativeSDK.addEventListener(
    OTEventName.showVendorList,
    () => console.log(' Vendor List shown')
  );

  this.vendorHideListener = OTPublishersNativeSDK.addEventListener(
    OTEventName.hideVendorList,
    () => console.log(' Vendor List hidden')
  );

  this.vendorConfirmListener = OTPublishersNativeSDK.addEventListener(
    OTEventName.vendorConfirmChoices,
    () => console.log(' Vendor Confirm clicked')
  );

  // All SDK views dismissed
  this.allViewsDismissedListener = OTPublishersNativeSDK.addEventListener(
    OTEventName.allSDKViewsDismissed,
    (interactionType) =>
      console.log(' All SDKs views dismissed:', interactionType)
  );

  // Consent change events
  this.purposeConsentListener = OTPublishersNativeSDK.addEventListener(
    OTEventName.preferenceCenterPurposeConsentChanged,
    (data) => console.log('Purpose consent changed:', data)
  );

  this.purposeLegitInterestListener = OTPublishersNativeSDK.addEventListener(
    OTEventName.preferenceCenterPurposeLegitimateInterestChanged,
    (data) => console.log(' Purpose legitimate interest changed:', data)
  );
}
Listeners should always be removed when the component unmounts:
//Remove OneTrust Event Listeners

componentWillUnmount() {
  if (this.bannerShowListener) this.bannerShowListener.remove();
  if (this.bannerHideListener) this.bannerHideListener.remove();
  if (this.bannerAcceptListener) this.bannerAcceptListener.remove();
  if (this.bannerRejectListener) this.bannerRejectListener.remove();

  if (this.pcShowListener) this.pcShowListener.remove();
  if (this.pcHideListener) this.pcHideListener.remove();
  if (this.pcAcceptListener) this.pcAcceptListener.remove();
  if (this.pcRejectListener) this.pcRejectListener.remove();
  if (this.pcConfirmListener) this.pcConfirmListener.remove();

  if (this.vendorShowListener) this.vendorShowListener.remove();
  if (this.vendorHideListener) this.vendorHideListener.remove();
  if (this.vendorConfirmListener) this.vendorConfirmListener.remove();

  if (this.allViewsDismissedListener)
    this.allViewsDismissedListener.remove();

  if (this.purposeConsentListener)
    this.purposeConsentListener.remove();

  if (this.purposeLegitInterestListener)
    this.purposeLegitInterestListener.remove();
}
Clear SDK Consents and Data
This method clears all data from the SDK:
OTPublishersNativeSDK.clearOTSDKData();Fetch Banner UI Data
This method is available as of 202604.1.0.
Fetches Banner UI data if not already available. Otherwise, returns data from local storage.
OTPublishersNativeSDK.fetchBannerCmpApiData()
    .then(bannerData => {
        console.log('Banner CMP API Data:', JSON.parse(bannerData));
    })
    .catch(error => console.error('fetchBannerCmpApiData error:', error));
Fetch Preference Center UI Data
This method is available as of 202604.1.0.
Fetches Preference Center UI data if not already available. Otherwise, returns data from local storage.
OTPublishersNativeSDK.fetchPreferencesCmpApiData()
    .then(preferencesData => {
        console.log('Preferences CMP API Data:', JSON.parse(preferencesData));
    })
    .catch(error => console.error('fetchPreferencesCmpApiData error:', error));
Fetch Vendors List UI Data
This method is available as of 202604.1.0.
Fetches Vendor List UI data if not already available. Otherwise, returns data from local storage.
OTPublishersNativeSDK.fetchVendorsCmpApiData()
    .then(vendorsData => {
        console.log('Vendors CMP API Data:', JSON.parse(vendorsData));
    })
    .catch(error => console.error('fetchVendorsCmpApiData error:', error));
Special Configurations
Passing Consent to WebViews
If your application uses WebViews to present content and the pages rendered are running the OneTrust Cookies CMP, you can inject a JavaScript variable, provided by SDK, to pass consent from the native application to your WebView.
The JavaScript must be evaluated before the Cookies CMP loads in the webview. Therefore, it is recommended to evaluate the JavaScript early on in the WebView load cycle.
getOTConsentJSForWebView
getOTConsentJSForWebViewvar jsToPass = await OTPublishersNativeSDK.getOTConsentJSForWebView()
//WebView JS Evaluation logic hereIf your application is using react-native-webview, any injected JavaScript is wrapped in a self-invoking function, meaning that any variables set are not in the global scope. For the OneTrust Cookie Compliance module to pick up the required changes, the variable must be at a global scope. To accomplish this, a substring can be used to place the payload in the window scope:
var jsToPass = await OTPublishersNativeSDK.getOTConsentJSForWebview()
jsToPass = `window.OTExternalConsent${jsToPass.substring(21)}`
//WebView JS Evaluation logic here
Example output:
var OTExternalConsent = {
  "USPrivacy": "1---",
  "addtlString": "",
  "consentedDate": "Tue, 6 Apr 2021 16:13:41 +0100",
  "groups": "C0002:1,C0003:1,C0005:0,C0004:0,C0001:1",
  "tcString":"CPEPMp6PEPMp6AcABBFRBUCgAAAAAAAAAChQHrAA...",
  "gppString":"DBABzw~1YNY~BVQqAA...."
}
Important
It's recommended that the application call getOTConsentJSForWebview when you need to render a WebView. This ensures the payload is up to date based on the user's latest consent.
However, if you have a use case to call this method after consent has been changed by the user on the app, you can utilize the OTConsentUpdatedbroadcast from the SDK. This event is broadcast any time a OneTrust UI has been dismissed.
Do not rely on the broadcasts for category events. Due to some order of operations under the hood, the JS variable above may not be updated by the time you call getOTConsentJSForWebview.
You can view more information (including FAQs) in the native documentation here: iOS | Android
Programmatically Update Consent
When using the out of the box UI, the SDK will handle updates to the consent status. However, the app can programmatically update a consent value for a category (e.g. C0002, C0003, etc) if needed. Modifying the user's consent is a two step approach. updatePurposeConsent is used to set the state of the consent (toggles) on the UI and saveConsent is used to commit and save the consent to local storage. **saveConsent MUST be called or consent will NOT be committed and changed. **
To update the consent status of a category:
OTPublishersNativeSDK.updatePurposeConsent("C0002",false)| Parameter | Type | Description |
|---|---|---|
| Category ID | String | ID of the category to be updated |
| Consent value | Boolean | Consent status given by the user for a category/group |
To save and log the changes:
Be sure to import {OTConsentInteraction} from react-native-onetrust-cmp
var result = await OTPublishersNativeSDK.saveOTConsent(OTConsentInteraction.preferenceCenterConfirm);| Interaction Types | Description |
|---|---|
| bannerAllowAll | User has accepted all on the banner. |
| bannerRejectAll | User has rejected all on the banner. |
| bannerContinueWithoutAccepting | User has selected the "Continue Without Accepting" CTA on the banner. |
| bannerClose | User has selected the 'x' on the banner. |
| preferenceCenterAllowAll | User has selected Allow All in the preference center. |
Apple App Tracking Transparency
If enabled in your template, OneTrust can render a pre-prompt UI and then show the App Tracking Transparency prompt immediately after. You can view more information about this here.
To surface the pre-prompt, call the following method. Be sure to import {OTDevicePermission} from 'react-native-onetrust-cmp' first.
showConsentUI
showConsentUIOTPublishersNativeSDK.showConsentUI(OTDevicePermission.IDFA).then(()=>{
console.log("ATT Prompt Complete")
})To get the status of the user's ATT selection:
getATTStatus
getATTStatusvar status = await OTPublishersNativeSDK.getATTStatus()
console.log(`ATT Status is ${status}`)Status will return:
- authorized
- denied
- notDetermined
- restricted
This is consistent with Apple's definitions.
Google Consent Mode
Google Consent Mode allows web and app developers to adjust tag and app SDK behavior based on user consent choices. Google will be able to dynamically adapt the behavior of Google tags, Google Analytics, Google Ads, Floodlight and Conversion Linker. View more information in the native documentation here: iOS | Android
To retrieve Google Consent Mode consent statuses:
OTPublishersNativeSDK.getOTGoogleConsentModeData();Sample response:
{
"analytics_storage": "GRANTED",
"ad_storage": "DENIED",
"ad_user_data": "DENIED",
"ad_personalization": "DENIED",
"functionality_storage": "GRANTED",
"personalization_storage": "GRANTED",
"security_storage": "DENIED"
}
Dark Mode
By default, the SDK will inherit the device's light mode and dark mode settings. You can programmatically set dark mode using the following methods:
iOS
Use the uxParams custom styling methods here. Set the shouldEnableDarkMode boolean to true.
Android
Set enableDarkMode to true for each UI method you need to use.
OTPublishersNativeSDK.showBannerUI({
  enableDarkMode: 'true',
});

OTPublishersNativeSDK.showPreferenceCenterUI({
  enableDarkMode: 'true',
});

OTPublishersNativeSDK.startSDK(
  'cdn',
  'app id',
  'en',
  {
    // androidUXParams: uxParamsJSON,
    // countryCode: '',
    enableDarkMode: 'true',
    // profileSyncParams: syncParams
  },
  true,
)
Customize User Interfaces
This section is optional as most UI configurations are primarily made through the OneTrust tenant. If your app has a use case where it needs make additional configurations (e.g. font family) otherwise not available in the tenant OR if it needs to control the UI configurations locally, you can use these custom configurations.
Custom Fonts are only supported on iOS through React Native. Android does not support Custom Fonts through uxParams.
Android - Custom styling with uxParams JSON
OneTrust allows you to add custom styling to the UI by passing in a formatted JSON. Build out your JSON by following the guide here.
Simply pass in the JSON as a string as a parameter in the initialization.
const uxParamsJSON = JSON.stringify(require('./assets/AndroidUXParams.json'));

OTPublishersNativeSDK.startSDK(
  'cdn.cookielaw.org',
  '162cfe19-aff6-4d60-b10e-6e7b6fdcfb8b-test',
  'th',
  {androidUXParams: uxParamsJSON},
  true,
)
iOS - Custom Styling with UXParams Plist
Custom styling can be added to your iOS app by using a .plist file in the iOS platform code. In addition to adding the .plist file (which can be obtained from the OneTrust Demo Application) to your bundle, there are a few changes that need to be made in the platform code, outlined below. Review the guide here.
In appDelegate.h, import OTPublishersHeadlessSDK and make sure that AppDelegate conforms to the OTUIConfigurator protocol.
#import <RCTAppDelegate.h>
#import <OTPublishersHeadlessSDK/OTPublishersHeadlessSDK.h>
#import <OTPublishersHeadlessSDK/OTPublishersHeadlessSDK-Swift.h>
#import <UIKit/UIKit.h>

@interface AppDelegate : RCTAppDelegate <OTUIConfigurator>

@end
In appDelegate.m, set the UIConfigurator to self. Then conform to the shouldUseCustomUIConfig and customUIConfigFilePath protocol methods.
#import "AppDelegate.h"
#import <React/RCTBundleURLProvider.h>

@implementation AppDelegate

- (BOOL)application:(UIApplication *)application didFinishLaunchingWithOptions:(NSDictionary *)launchOptions
{
  // Conform to this in order to customize the UI.
  OTPublishersHeadlessSDK.shared.uiConfigurator = self;
  return true;
}

- (BOOL)shouldUseCustomUIConfig {
  return  YES;
}

- (NSString *)customUIConfigFilePath {
    NSString *filename = [self getCustomConfigFileName];
    NSString *path = [[NSBundle mainBundle] pathForResource:filename ofType:@"plist"];
    return path;
}

- (NSString *)getCustomConfigFileName {
    NSString *filename = @"OTSDK-UIConfig-iOS";
    if ([self isDarkMode]) {
        filename = @"OTSDK-UIConfig-iOS-Dark";
    }
    return filename;
}

// Helper method (stub) - implement this based on your logic
- (BOOL)isDarkMode {
    if (@available(iOS 13.0, *)) {
        UIUserInterfaceStyle style = UIScreen.mainScreen.traitCollection.userInterfaceStyle;
        return style == UIUserInterfaceStyleDark;
    }
    return NO;
}
Here's the sample OUTSDK-UIConfig-iOS.plist file for light and dark mode
Retrieve Data Subject Identifier
The current active data subject identifier can retrieved programmatically by calling:
var id = await OTPublishersNativeSDK.getCurrentActiveProfile()Rename Data Subject Identifier
This method is available as of 202604.1.0.
Sets/renames the identifier for the current user.
OTPublishersNativeSDK.renameProfile('oldUserId', 'newUserId')
    .then(success => {
        console.log('Profile renamed successfully:', success);
    })
    .catch(error => {
        console.error('Error renaming profile:', error);
    });
Customize SDK Log Levels
The OneTrust SDK supports the ability to customize log types printed to the console. You can control this log level by passing in your preferred minimum log level.
OTPublishersNativeSDK.enableOTSDKLog(OTLoggerConstant.noLogs);| Log Level | Description |
|---|---|
| OTLoggerConstant.error | Logs only errors |
| OTLoggerConstant.warning | Logs warnings and everything above |
| OTLoggerConstant.info | Logs info and everything above |
| OTLoggerConstant.debug | Logs debug and everything above |
| OTLoggerConstant.verbose | Logs verbose and everything above |
| OTLoggerConstant.noLogs | Turns off all SDK logging |
Universal Consent Purposes
Universal Consent Purposes for Mobile is part of the UCPM offering and you must have a UCPM license to use this module.
Universal Consent can be used to serve a different use case compared to the regular Mobile App Consent banner and this can also be configured within the Mobile SDK. Rather than collecting user consent to help manage SDKs and other technologies on the app, Universal Consent helps collect consent for purposes like promotional emails, newsletters, SMS messaging, etc. that typically require an integration with a third party system like Salesforce and Marketo. After a Universal Consent transaction is collected, integration workflows can be triggered within the OneTrust tool.
Universal Consent requires a user identifier to work properly. In order to set a data subject and keep their consent in sync with other collection methods, utilize the guidance for cross-device consent above.
Display Universal Consent Preference Center
To load the Universal Consent preference center over the current screen:
OTPublishersNativeSDK.showConsentPurposesUI()Query for Consent Values
This plugin exposes async methods to retrieve the current state of the users' consent.
To query for purpose consent:
var consent = await OTPublishersNativeSDK.getUCPurposeConsent('purposeId')| Argument | Type | Description |
|---|---|---|
| purposeId | String | The GUID of the purpose to retrieve. |
Value returned:
| Status | Explanation |
|---|---|
| 1 | Consent is given |
| 0 | Consent is not given |
| -1 | Consent not yet gathered, or SDK not initialized |
To query for a custom preference nested under a purpose:
var consent = await OTPublishersNativeSDK.getUCCustomPreferenceConsent('customPreferenceOptionId',
'customPreferenceId','purposeId')| Argument | Type | Description |
|---|---|---|
| customPreferenceOptionId | String | The GUID of the custom preference option |
| customPreferenceId | String | The GUID of the custom preference group |
| purposeId | String | The GUID of the purpose under which the custom preference is nested. |
Value returned:
| Status | Explanation |
|---|---|
| 1 | Consent is given |
| 0 | Consent is not given |
| -1 | Consent not yet gathered, or SDK not initialized |
Programmatically Set Consent Values
The package exposes methods to programmatically set the users' consent values. A common use case is when a sign-up form has a checkbox at the bottom to allow the user to opt into emails. In this case, the application would set the value of the associated purpose, and the user could change his or her decision later in the preference center.
After making consent updates, the application must call the saveUCConsent() function to commit the changes.
To update the top-level purpose's consent:
var consent = await OTPublishersNativeSDK.updateUCPurposeConsent('purposeId', true)| Argument | Type | Description |
|---|---|---|
| purposeId | String | The GUID of the purpose to update |
| consent | Boolean | Whether or not consent has been granted for the specified purpose |
To update a custom preference nested under a purpose:
var consent = await OTPublishersNativeSDK.updateUCCustomPreferenceConsent('customPreferenceOptionId',
'customPreferenceId','purposeId', true)| Argument | Type | Description |
|---|---|---|
| customPreferenceOptionId | String | The GUID of the custom preference option |
| customPreferenceId | String | The GUID of the custom preference group |
| purposeId | String | The GUID of the purpose under which the custom preference is nested. |
| consent | Boolean | Whether or not consent has been granted for the specified item |
Save Consent
After making updates to the consent values, the application must call the following method to commit the changes:
OTPublishersNativeSDK.saveUCConsent()FAQ
Why am I getting an Android build error when using React Native library version 202601.1.0?
If you are using version 202601.1.0 of the React Native library, you may encounter an Android build error related to the overrideDataSubjectIdentifer() method.
This happens because overrideDataSubjectIdentifer() was deprecated in Android, which is the root cause of the build failure in this version.
To resolve the issue, update the React Native library to version 202601.2.0 or greater. Starting in 202601.2.0, the deprecated overrideDataSubjectIdentifer() method was removed, which fixes the Android build error.
Updated 26 days ago