Scan Apps via API
It's commonly requested for mobile app R&D teams to be able to scan new versions of their mobile apps programmatically as part of their continuous integration and delivery process. Using OneTrust's Integrations module, the ability to Scan Apps via API unlocks the ability to scan new apps and rescan existing apps without having to login to OneTrust and upload the app file in the UI. We support both REST and FTP approaches, depending on file size.
How To Setup
The following is required to Scan Apps with Integrations.
- Create Integration workflow in the OneTrust Integrations module.
- Decide and Implement your Integration Method and update the Integration workflow accordingly.
- Prepare for Testing by collecting API endpoint and authentication credentials.
- Test the Workflow and work through integration process.
- Monitor logs to confirm success or troubleshoot issues.
Create Integration Workflow
- On the Integrations menu, select Gallery. The Integration Gallery screen appears.
- Use the search to locate the Generic system tile.
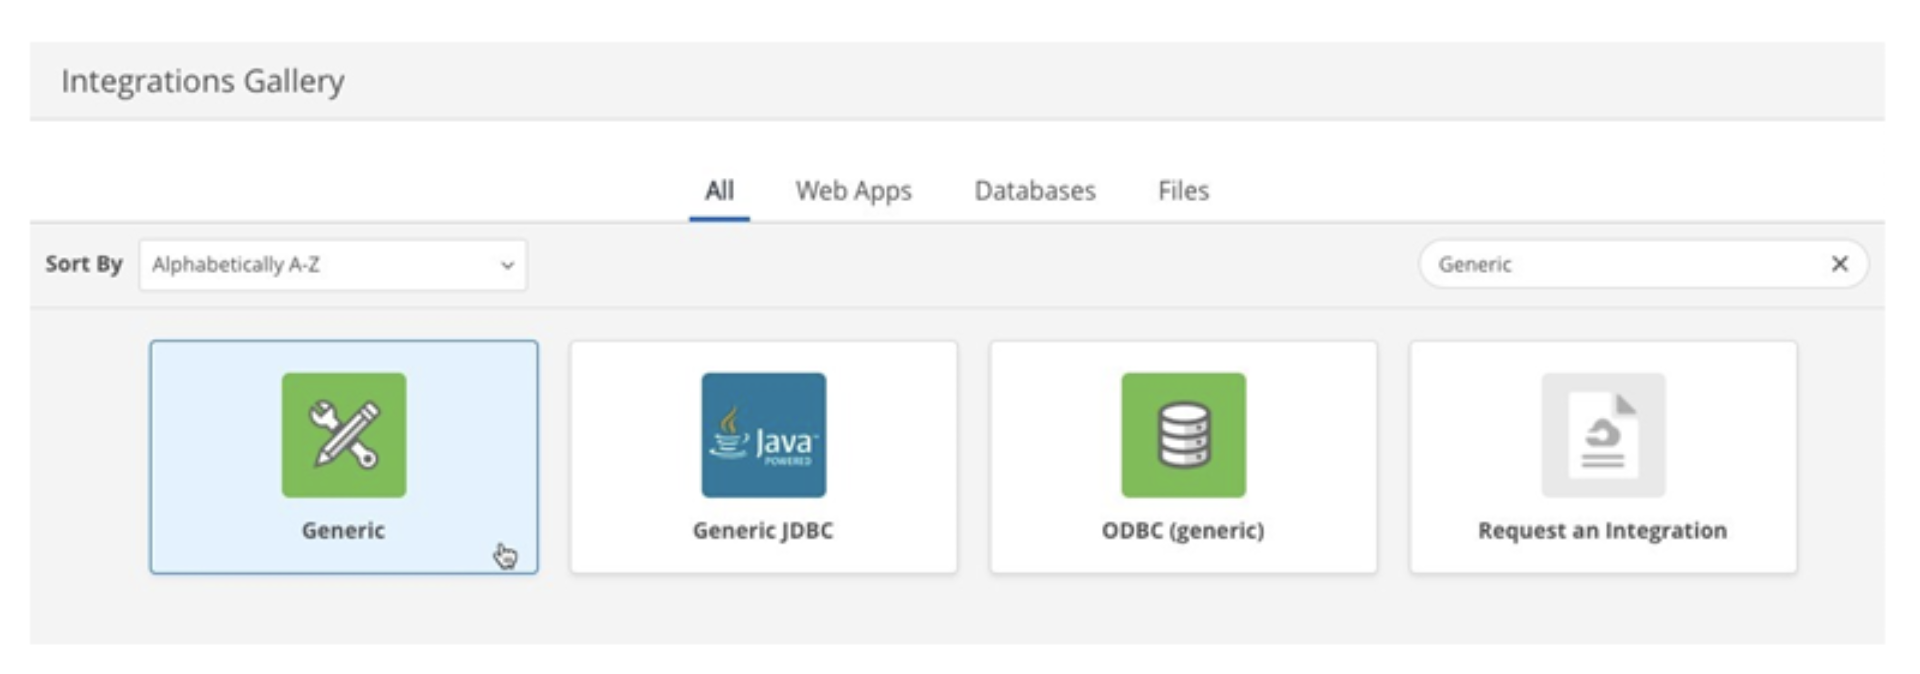
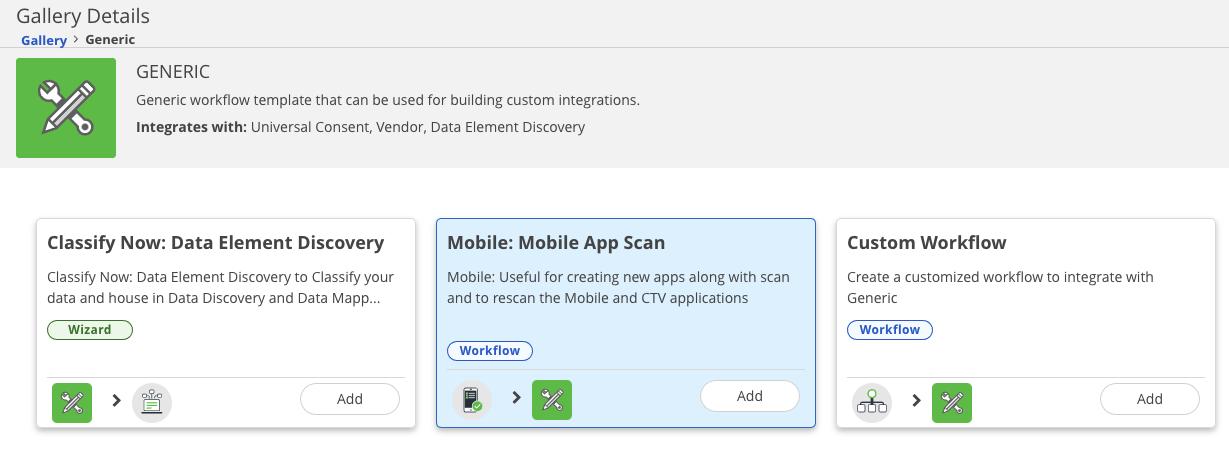
- Click the Generic system tile. The Gallery Details screen appears.
- Click the Add button on the Mobile: Mobile App Scan workflow. The Add Workflow Name modal appears.
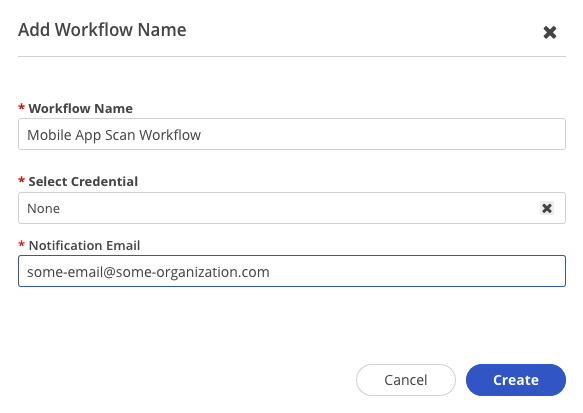
- Complete the fields in the modal, then click the Create button. The Workflow Builder screen appears.
| Field | Description |
|---|---|
| Workflow Name | Enter a unique name for this new connection. |
| Select Credential | Select None. The API call will use Client Credentials to authorize access to the given tenant for security purposes. |
| Notification Email | Enter the user email that should receive all notification alerts for this workflow. |
- Click the Activate button in top-right.
Decide and Implement the Integration Method
Currently, there are 2 methods to implement and it mainly depends on file size.
Implement via REST API
On creation of new App Scan workflow, it is setup for REST API using form-data by default. If your application is < 64MB and prefer this approach, then please proceed to Prepare for Testing section.
If your application file is > 64 MB, you can skip this section and proceed to FTP configuration instead.
Implement via FTP
To complete an FTP setup, you'll need to complete 2 steps:
- Update the Webhook Action
uploadTypeto beFTPand proviefilePathinformation - Add an Action to Download Files from your FTP location
Update Webhook Action for FTP
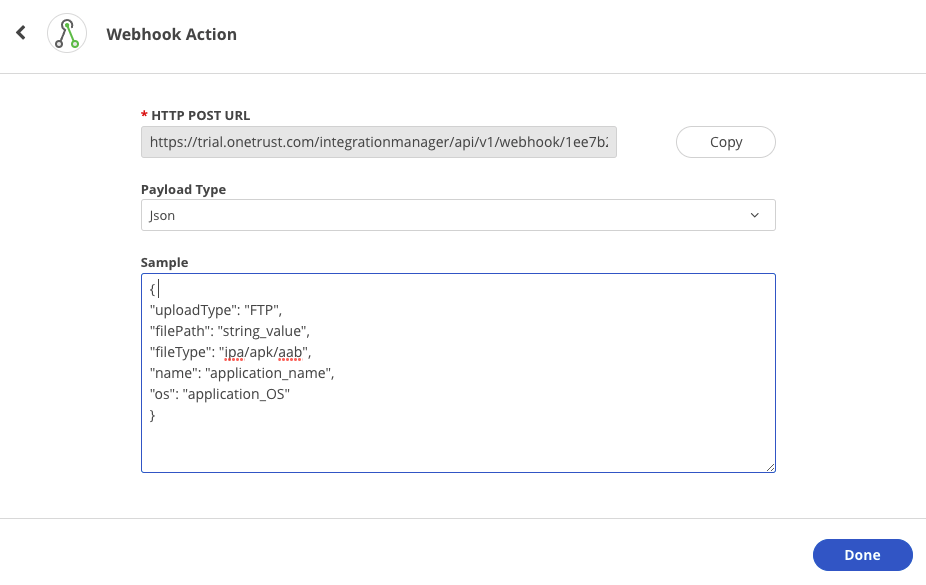
- In the Workflow Builder screen, click the Edit icon on the Webhook Action.
- Select
JSONfor Payload Type and paste in the following JSON payload to Sample
{
	"uploadType": "FTP",
	"filePath": "string_value",
	"fileType": "ipa/apk",
	"name": "application_name",
	"os": "application_OS"
}
Add Action to Download Files from FTP
- In the Workflow Builder screen, click the
+icon under the Conditional section before the POST call - Select Download File(s) from FTP
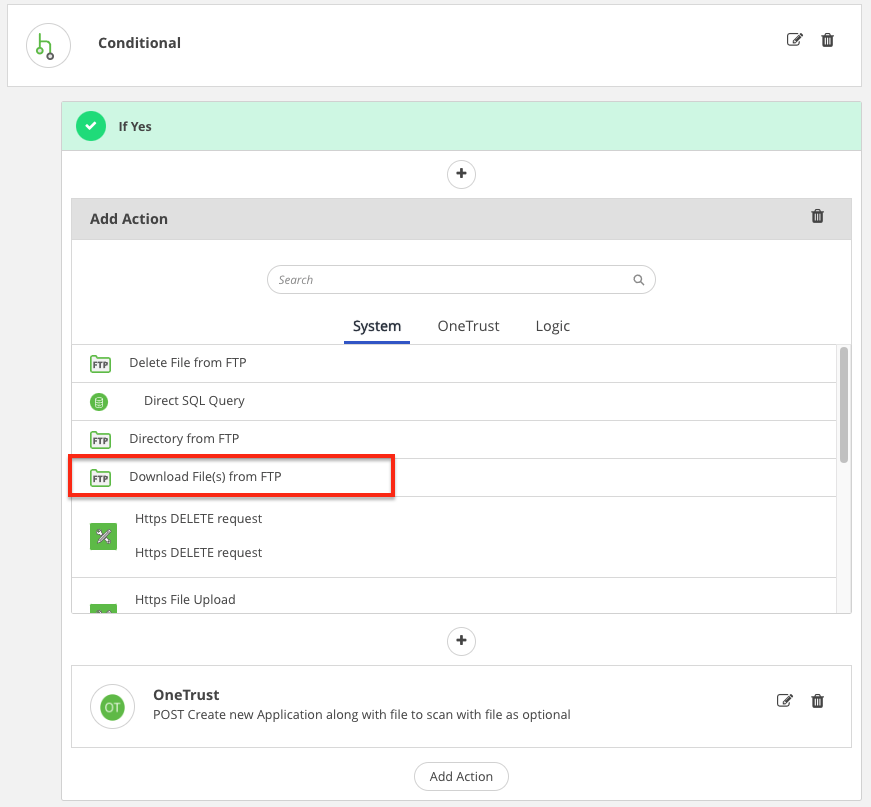
- Select your FTP credentials and click Next
- Add the path to your FTP file and click Finish
- Edit the POST Create New Application by clicking the edit icon and then Advanced View button to expose the Body
- Add the below Freemarker + JSON under Body section and click Finish
{
	<#list 0..step.ftp_1.fileInfoList?size-1 as n>
  "fileId": "${(step.ftp_1.fileInfoList[n].reference)!}",
  "fileType": "${(event.payload.fileType)!}",
  "name": "${(event.payload.name)!}",
  "orgId": "${(event.userDetails.orgGroupId)!}",
  "os":"${(event.payload.os)!}"
  <#if step.ftp_1.fileInfoList?size-1 != n>,</#if>
  </#list>
}
Prepare for Testing
Copy the POST URL
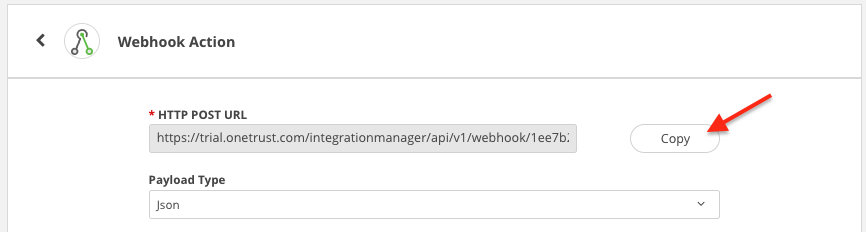
- In the Workflow Builder screen, click the Edit icon on the Webhook Action.
- Click the Copy button to copy the HTTP POST URL. Save this for later reference to use during the API call.
Create OAuth 2.0 Client Credential
You'll need to create an OAuth 2.0 Client Credential to authorize the API calls' access to the OneTrust application. This information will need to be provided when configuring the API calls' authentication requirements. For more information, see Managing OAuth 2.0 Client Credentials.
- In the OneTrust application, click the gear icon in the upper right-hand corner to access Global Settings.
- On the Global Settings menu, select Access Management > Client Credentials. The Credentials screen appears.
- Click the Add button. The Client Credentials section of the Add Client Credential screen appears.
- In the Name field, enter a name for the client credential. Please note the Name will not be able to be modified after creation.
- Optional: In the Description field, enter a description for the client credential.
- In the Access Token Lifetime field, select the amount of time that should pass before the access token expires. The following options are available:
| Access Token Lifetime options |
|---|
| 1 Hour |
| 1 Day |
| 1 Week |
| 1 Month |
| 1 Year |
- Click the Next button. The Scope section appears.
- Enable ALL for the Integration Scope AND the Cookie Scope.
- Click the Create button. The Client ID and Secret section appears.
- In the Download Credential field, click the Download button. A
.txtfile containing the Client ID and Client Secret details will download to your local system. - Click the Close button.
Test the Workflow
Setup the API Call to OneTrust Webhook
General
| Request Type | POST |
| Request URL | POST URL copied from Workflow |
Authorization
| Type | OAuth 2.0 |
| Grant Type | Client Credentials |
| Access Token URL | https://{environment}.onetrust.com/api/access/v1/oauth/token |
| Client ID | From OT OAuth 2.0 credential |
| Client Secret | From OT OAuth 2.0 credential |
| Client Authentication | Send as Basic Auth Header |
| Access Token | generated by provision of the above requirements |
Headers
| Content-Type | application/json |
Body
| Body Type | form-data |
Key: file | .ipa | .apk |
Key: dataFields | Applicable JSON based on New Scan or Rescan (see below) |
Test a New App Scan
- Ensure the necessary authentication parameters and headers are provided to connect with your given OneTrust environment.
- In your developer tool, create a POST call and paste the HTTP POST URL copied from the Webhook Trigger action in the OneTrust application.
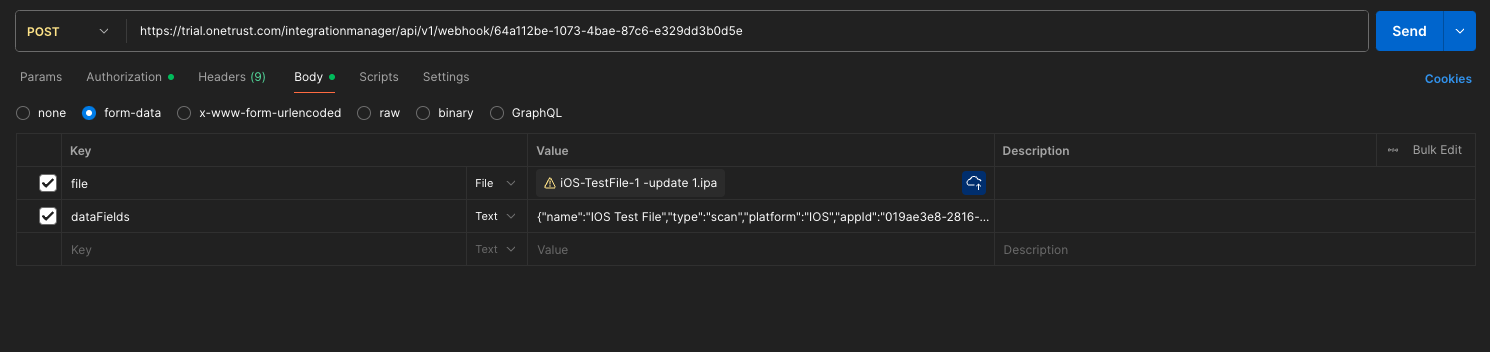
- In the Body, select a package file (e.g.
.ipaor.apk) for the Value of the field Key. File upload limit is 64MB. - In the Body, provide the following JSON as the Value of the
dataFieldsKey.
// name:		Enter your new app's name
// platform:	Choose a platform according to your file type

{
	"name": "App Name",
	"platform": "IOS" //input IOS or ANDROID based on app platform. Must be capitalized
}
- Send the call. Upon a successful response (202), you should receive a request ID. This will be the corresponding string found in the workflow log.

- For information on how to view your scan results, see Viewing and Categorizing Scan Results.
The mobile app Production ID can be found in the Instructions tab on the SDK screen.
Test Rescan of App
- Ensure the necessary authentication parameters and headers are provided to connect with your given OneTrust environment.
- In your developer tool, create a POST call and paste the HTTP POST URL from the Webhook Trigger action in the OneTrust application.
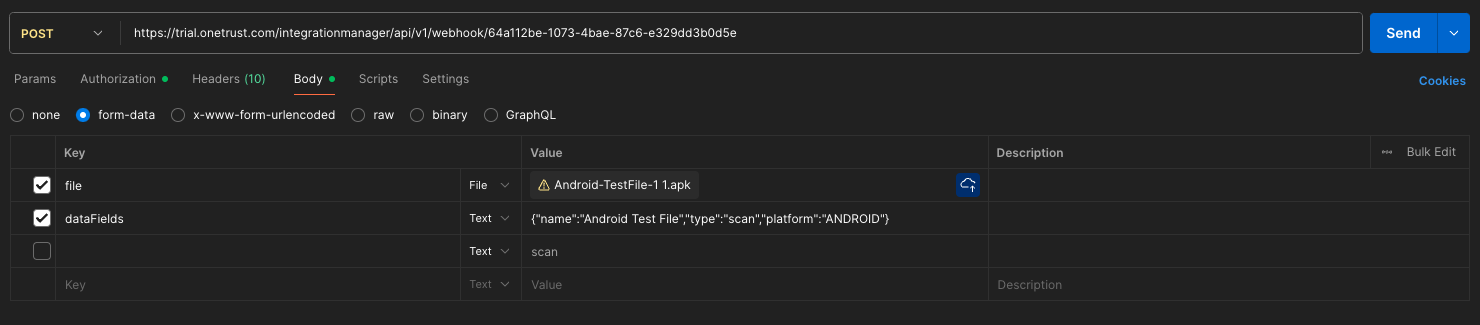
- In the Body, select the new package file. (e.g. .ipa or .apk) for the Value of the field Key.
- In the Body, provide the following JSON as the Value of the
dataFieldsKey.
// appId:		Provide your mobile app's ID,
// platform:	Choose a platform according to app type

{
	"appId": "app ID for which you want to rescan",
	"platform": "ANDROID"
}
The mobile app Production ID can be found in the Instructions tab on the SDK screen.
- Send the call. Upon a successful response (202), you should receive a request ID. This will be the corresponding string found in the workflow log.

- For information on how to view your scan results, see Viewing and Categorizing Scan Results.
Monitor Logs
- In the OneTrust application, navigate to the Logs tab in the Workflow Builder screen.
- Locate and select the Event ID to review the workflow log. You can also copy and paste the request ID to quickly locate the log.
- Observe the new app name is present, with the correct platform type, and scan against the uploaded file.
Updated 7 months ago