Tealium Tag Manager
Google Consent Mode integration with Tealium Tag Manager
If you use Tealium to manage the cookies on your website, you can integrate with your banner script so visitors to your websites can control their consent preferences. For step-by-step guidelines, see Cookie Consent Integration with Tealium.
Tealium Tag Manager directly supports the implementation of Google Consent Mode using OneTrust. To configure Google Consent Mode within OneTrust, follow the guidelines in Cookie Consent Integration with Google Consent Mode. Whilst mapping the OneTrust Cookie Categories to Google Consent Types, OneTrust by default maps the Performance category with analytics_storage, and the Targeting category with ad_storage, ad_user_data, and ad_personalization. You can customize these associations by assigning different categories to each consent key. After making your changes, save the settings in the geolocation rule.
Mapping Consent Purposes for Google Consent Mode in Tealium Tag Manager
To map end-user consent choices to Google Consent Mode settings in Tealium Tag Manager, create a JavaScript Code extension. Use this extension to capture the user’s current consent decisions for various purposes or vendors. Then, assign a status of either granted or denied (or true/false in specific cases) to the appropriate Google Consent Mode purposes or settings.
JavaScript Extension Template
Set up the JavaScript extension using the template code below. Configure it to run after load rules and set it to run always.
// After Load Rules - Run Always
b.consent_decision = (tealiumConsentRegister && tealiumConsentRegister.currentDecision) || [];
b.google_ad_storage_consent = <your-logic-here> ? 'granted' : 'denied';
b.google_ad_user_data_consent = <your-logic-here> ? 'granted' : 'denied';
b.google_analytics_storage_consent = <your-logic-here> ? 'granted' : 'denied';
b.google_ad_personalization_consent = <your-logic-here> ? 'granted' : 'denied';
b.google_ads_data_redaction = <your-logic-here> ? 'true' : 'false';
b.google_url_passthrough = <your-logic-here> ? 'true' : 'false';
Replace <your-logic-here> with conditions that evaluate the user’s consent and return either 'granted' or 'denied', or true or false, depending on the requirement.
If you are using the default OneTrust Cookie Category ID's, the logic will be similar to the following:
// After Load Rules - Run Always
b.consent_decision = (tealiumConsentRegister && tealiumConsentRegister.currentDecision) || [];
b.google_ad_storage_consent = b.consent_decision.indexOf('C0004') !== -1  ? 'granted' : 'denied';
b.google_ad_user_data_consent = b.consent_decision.indexOf('C0004') !== -1 ? 'granted' : 'denied';
b.google_analytics_storage_consent = b.consent_decision.indexOf('C0002') !== -1 ? 'granted' : 'denied';
b.google_ad_personalization_consent = b.consent_decision.indexOf('C0004') !== -1 && b.consent_decision.indexOf('C0002') !== -1 ? 'granted' : 'denied';
Testing Google Consent Mode Integration on Your Website
To determine the appropriate consent parameters for the JavaScript extension, follow these steps:
- Clear your browser’s cookies and cache. This ensures a clean state for testing consent behavior.
- Visit the website or staging environment where the latest version of the Consent Manager or Consent Integrations template is active.
- If the site uses an opt-in model (such as GDPR-style consent), accept all tracking options in the consent dialog.
- Open your browser’s developer tools and go to the Console tab.
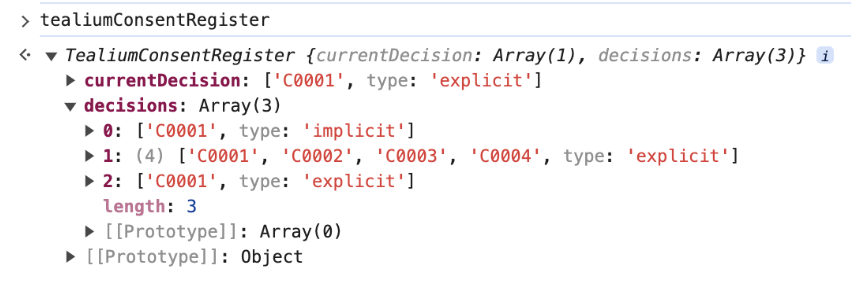
- Enter
tealiumConsentRegisterin the console to inspect the object. This object includes two arrays:currentDecisionanddecisions. ThecurrentDecisionarray shows the purposes currently granted by the user. (See example below)
By reviewing the tealiumConsentRegister object, you can identify the consent values needed for mapping in the Google Consent Mode integration.
Updated 7 months ago