Initialize SDK
Overview
The OneTrust SDK retrieves and saves all the data needed to display the CMP UI and collect consent for the purposes, vendors and SDKs used by the application. The data returned is determined by the configurations made in the OneTrust Admin console.
Before the SDK can be successfully initialized, ensure that the appropriate SDK data version has been published in the OneTrust tenant/admin console. If it has not been published, there will be no data to retrieve. View instructions on how to publish here.
Steps for Setting up OneTrust SDK
Step 1: Setup UI (Auto determine and show OneTrust SDK UI as part of initialization)
OneTrust SDK provides the capability to determine if OneTrust Banner or Preference Center needs to be shown automatically once it retrieves, parses and saves the data from the admin console.
setupUI(_:, UIType:)
setupUI(_:, UIType:)Parameters:
viewController: The View Controller of the application on which the OT SDK UI will be presented.UIType: Represents the various types of OT SDK UI that can be presented using this API. Whatever type is passed here, will be displayed if the conditions are satisfied. If the app does not want to show OT SDK UI, then skip this parameter or pass in .none.
Important
- Calling this method before calling the startSDK will make sure that OneTrust SDK determines if Banner or Preference Center UI should be shown after the data is processed and then displays them accordingly
- Even if an application does not want the OneTrust SDK to automatically determine and show UI, this method needs to be called ahead of
showBannerUIandshowPreferenceCenterUI.- You can pass the
UITypeas either banner or preference center.- If
UITypeis not passed as part of this method, then OneTrust SDK will not automatically display its UI even if the UI has to be shown (based on the shouldShowBanner flag). The application in that case should have the logic to check banner status (if consent is given by the user already or not) and then call the available public APIs to display banner or preference center.
// Setup with Banner
OTPublishersHeadlessSDK.shared.setupUI(appViewController, UIType: .banner)

// Setup with Preference Center
OTPublishersHeadlessSDK.shared.setupUI(appViewController, UIType: .preferenceCenter)

// Setup without any OneTrust UI
OTPublishersHeadlessSDK.shared.setupUI(appViewController)
Step 2: Start SDK (Downloads and saves the OneTrust data and setups UI if step 1 is configured)
startSDK(storageLocation:, domainIdentifier:, languageCode:, params:, loadOffline:, completionHandler:)
startSDK(storageLocation:, domainIdentifier:, languageCode:, params:, loadOffline:, completionHandler:)- Parameters:
storageLocation: Contains the storage location from where data has to be fetched (ex: "cdn.cookielaw.org")domainIdentifier: Represents the SDK identifier configured on OneTrust Admin console (ex: "5376c4e0-8367-450c-8669-a0d41bed69ac").languageCode: Contains valid ISO Language code for language for which localized data has be fetched (ex: "en").params: Parameter containing additional SDK parameters like country, region code, profile parameters etc.loadOffline: Sets up the OT SDK using offline data that can be setup by the application via available public APIsetOTOffileData(_:). By default this value will be set to false.completionHandler: The block of code that will be triggered once the OneTrust SDK setup is complete. Completion Handler contains response object that contains either the server response in the form of a string or an error object if in case the call has failed.-
Important
- It is recommended that the application makes a call to this
startSDKmethod every time app is launched.- Any OneTrust UI public APIs can be called inside the completion handler of
startSDK. LikeshowBannerUIorshowPreferenceCenterUIcan be after checking theshouldShowBannerstatus if step 1 is not implemented (i.e., if application wants to control displaying of OneTrust UI).- This call would fail if there are internet connectivity issues, invalid storage url/domain-Identifier/language-code is passed.
- In order for OneTrust SDK to determine and display OneTrust SDK UI, please implement Step 1.
- As part of Step 1, if the UIType is set to:
bannerornone: This method will display Banner UI and then call the completion handler. In the response of the completion handler, Banner response from CMP API will be available.preferenceCenter:This method will display Preference Center UI and then call the completion handler. In the response of the completion handler, Preference Center response from CMP API will be available.- Starting 202504.1.0,
startSDKwill no longer download all the data. It will download data on the fly i.e., as and when the user navigates to Preference Center or Vendors, OneTrust SDK will make the corresponding network call to CMP API and fetch the corresponding data.
// Swift
OTPublishersHeadlessSDK.shared.startSDK(
	storageLocation: "cdn.cookielaw.org",
	domainIdentifier: "3598fb78-0000-1111-2222-83ee558d6e87",
	languageCode: "en",
	params: sdkParams,
	loadOffline: false
) { response in
	 print("status: \(response.status)")
	 print("result: \(response.responseString ?? "")")
	 print("error: \(response.error ?? "")")

	 // Take next action...
}
Successful initialization
After the SDK is successfully initialized at least once, it caches the data locally on the device. If the initialization fails the next time around, users will still be able to access the CMP UI and make consent choices.
Response Object
This is the return of the startSDK() method. It is OTResponse type.
| Field | Description | Type |
|---|---|---|
| status | Represents if the OT SDK data download call was successful or not. | Bool |
| responseString | Represents the entire server response received while starting OT SDK. | String |
| error | Represents any error that has occurred while starting OT SDK. | Error |
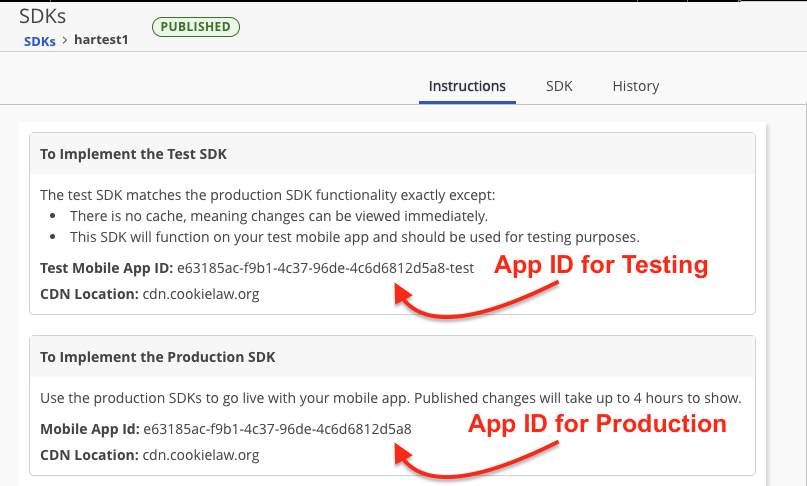
What should the storageLocation value be?
storageLocation value be?The storageLocation parameter is the CDN Location value which you retrieve from the OneTrust Admin under SDKs > {Select App from List} > Instructions (pictured below). This value is OneTrust environment dependent and the potential values can also be found using the Location header table on the Mobile App Data API reference.
What should the domainIdentifier value be?
domainIdentifier value be?The domainIdentifier parameter is the Mobile App ID value which you retrieve from the OneTrust Admin under SDKs > {Select App from List} > Instructions (pictured below).
OTSDKParams
OTSDKParamsThis parameter is of type OTSDKParams which provides various configurations that can be set by the application while setting up OneTrust SDK.
init(countryCode:regionCode:)- This is the initializer for OTSDKParams.
- The OneTrust SDK, by default, determines a country and region code for a user based on a geo-ip lookup when calling startSDK, to deliver a certain template. If you choose to perform your own geolocation lookup, this is supported by using the countryCode and regionCode parameters mentioned above.
- Parameters:
countryCode:Two-letter ISO 3166-2 country code. This can be used to bypass the automatic geo-ip lookup performed by the SDK.regionCode:Two-letter state code, used alongside countryCode, typically used for CPRA use cases when providing an experience for California-based US citizens.
setShouldCreateProfile- Call this method and pass in the value as “
true“ ONLY if the application wants to enable cross device consent functionality for the user. Please contact your OneTrust Consultant for more information on this feature. - This method is mandatory for cross device consent to work.
- Call this method and pass in the value as “
setProfileSyncParams[Optional]- Call this method only if the application wants to configure the profile as part of Cross Device Sync. If cross device consent is not enabled, we do not need to call this method and setup profile config.
- This method takes in a parameter of type
OTProfileSyncParams.setSyncProfile(_:)- Set this method to “
true" if cross device consent needs to be enabled. - This method is mandatory for cross device consent to work.
- Set this method to “
setSyncProfileAuth(_:)- Call this method and set the JWT token associated with the user identifier as the parameter.
- This method is mandatory for cross device consent to work.
setSyncGroupId(_:)- Call this method if application wants to set a sync group identifier.
- This method is optional for cross device consent.
setIdentifier(_:)- Call this method to pass in the user identifier as the parameter.
- If no identifier is passed or this method is not called, OneTrust SDK will create a random GUID and use that as the identifier.
setIdentifierType(_:)- Call this method to set an identifier type.
This method is optional for cross device consent
- Call this method to set an identifier type.
// Cross Device Consent Sample Code

let profileParams = OTProfileSyncParams()
profileParams.setIdentifier("ENTER USER ID")
params.setSyncGroupId("someGroupId")
params.setSyncProfile("true")
params.setSyncProfileAuth("ENTER JWT TOKEN")

let sdkParams = OTSdkParams(countryCode: "US", regionCode: "CA")
sdkParams.setShouldCreateProfile("true")
sdkParams.setProfileSyncParams(profileSyncParam)
// Non-Cross Device Consent Sample Code

let profileParams = OTProfileSyncParams()
profileParams.setIdentifier("ENTER USER ID")

let sdkParams = OTSdkParams(countryCode: "US", regionCode: "CA")
sdkParams.setProfileSyncParams(profileSyncParam)
Step 3: Downloading Preference center and Vendors Data (Optional)
Starting 202504.1.0, only Banner or Preference center data will downloaded based on the UIType passed in Step 1. If application wants to download the rest of the data as well as part of the setup, application can call the corresponding public APIs available, once the completion handler of startSDK is triggered
Note:
If this step is skipped, OneTrust SDK will make the corresponding network call when the user tries to navigate to that UI Screen. If the call is successful, then will navigate the user to the corresponding UI.
If the network call fails, OneTrust SDK will display and log appropriate error.
Sample code: OneTrust SDK performing the SDK UI Presentation
// Step 1
OTPublishersHeadlessSDK.shared.setupUI(appViewController, UIType: .banner)
// Step 2
OTPublishersHeadlessSDK.shared.startSDK(
	storageLocation: "cdn.cookielaw.org",
	domainIdentifier: "3598fb78-0000-1111-2222-83ee558d6e87",
	languageCode: "en",
	params: sdkParams,
	loadOffline: false
) { response in
      print("status: \(response.status)")
      print("result: \(response.responseString ?? "")")
      print("error: \(response.error ?? "")")

      // Step 3 (only supported 202504.1.0 onwards and this is optional)
      fetchPCAndVendorsData() {
          // Take other actions.
      }
}

func fetchPCAndVendorsData(completion: @escaping () -> Void) {
    OTPublishersHeadlessSDK.shared.fetchPreferenceCenter() { pcDataAsDictionary in
        print(pcDataAsDictionary)
        OTPublishersHeadlessSDK.shared.fetchVendorsCmpApiData() { vendorsDataAsDictionary in
            print(vendorsDataAsDictionary)
            completion()
        }
    }
}
Sample code: Application taking control over presenting OneTrust UI
OTPublishersHeadlessSDK.shared.startSDK(
	storageLocation: "cdn.cookielaw.org",
	domainIdentifier: "3598fb78-0000-1111-2222-83ee558d6e87",
	languageCode: "en",
	params: sdkParams,
	loadOffline: false
) { response in
      print("status: \(response.status)")
      print("result: \(response.responseString ?? "")")
      print("error: \(response.error ?? "")")

      guard let responseString = response.responseString, !responseString.isEmpty,
            response.error == nil else {
              return "OneTrust Setup failed."
      }

      // Step 3 (only supported 202504.1.0 onwards and this is optional)
      fetchPCAndVendorsData() {
            guard OTPublishersHeadlessSDK.shared.shouldShowBanner() else { return }
            DispatchQueue.main.async {
                OTPublishersHeadlessSDK.shared.setupUI(appViewController)
                OTPublishersHeadlessSDK.shared.showBannerUI()
            }
          // Take other actions.
      }
}

func fetchPCAndVendorsData(completion: @escaping () -> Void) {
    OTPublishersHeadlessSDK.shared.fetchPreferenceCenter() { pcDataAsDictionary in
        print(pcDataAsDictionary)
        OTPublishersHeadlessSDK.shared.fetchVendorsCmpApiData() { vendorsDataAsDictionary in
            print(vendorsDataAsDictionary)
            completion()
        }
    }
}
Passing Custom Geolocation
The OneTrust SDK, by default, determines a country and region code for a User based on a geo-ip lookup when calling startSDK. to deliver a certain template. If you choose to perform your own geolocation lookup, this is supported by using the countryCode and regionCode parameters mentioned above.
Retrieving User Location
The SDK returns the location where data was last downloaded and can be used to determine user location. Returns a string.
let userLocation = OTPublishersHeadlessSDK.shared.getLastDataDownloadedLocation()
print("User Country: \(userLocation.country), User State: \(userLocation.state)")
The SDK returns the location where the user last interacted with the SDK UI and provided consent. Returns a string.
let consentedLocation = OTPublishersHeadlessSDK.shared.getLastUserConsentedLocation()
print("User Country: \(consentedLocation?.country), User State: \(consentedLocation?.state)")
Configuring Banner Height
By default, the OneTrust SDK renders the Banner in full screen. You can update this to instead be Two-thirds, Half, or One-third depending on preference.
Recommended Way: OneTrust recommends configuring the Banner Height from the OneTrust Admin via Templates > Mobile App > Banner > General. This way it can be updated via Publish instead of being hard-coded to the application and require a version update to App Stores.
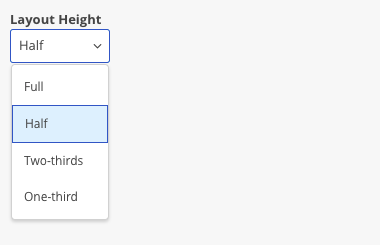
Legacy Way: Set the OTBannerHeightRatio parameter to either .two_third, .one_half, or one_third.
setOTOfflineData()
setOTOfflineData() We have introduced an offline data mode which can be used to initialize the OneTrust SDK offline by passing in the json data required for OneTrust SDK setup from the application. This can be achieved by calling the OTOfflineData.setOTOfflineData(_:).
Note: Currently setupOTOfflineData(_:) will only work for one JSON at a time, which means we can only support one geolocation rule and one language.
If the loadOffline parameter is passed as false and there is no internet connectivity while making the network call to OneTrust, the OneTrust SDK will try using the offline data that is set up using OTPublishersHeadlessSDK.shared.setOTOfflineData(\_:). If no data is available, the SDK will fail to initialize.
If the loadOffline parameter is passed as true, the SDK will only use the offline data set up using OTPublishersHeadlessSDK.shared.setOTOfflineData(\_:). If no data is available, the SDK will fail to initialize.
Setting up OneTrust Data JSON in the application to pass to OneTrust SDK:
202504.1.0 onwards
We have separate endpoints for fetching Banner, Preference Center and Vendors.
- Data for fetching the Banner JSON and passing from the app: Get Banner Data
- Data for fetching the Preference Center JSON and passing from the app: Get Preference Center Data
- Data for fetching the Vendors JSON and passing from the app: Get IAB and Google Vendors
Note: This change was made as part of CMP API adoption in order to make the processing faster by only downloading and processing the data that the user is navigating to.
Prior to 202504.1.0
We have a single endpoint for fetching all the OneTrust data (Banner, Preference Center, Vendors and Universal Consent Preferences).
In order to retrieve the JSON needed for offline mode, you will have to fetch the data using our mobile data endpoint: Get SDK Configuration.
Note
The endpoints below are only needed if your app is using IAB TCF Framework. If you're not using Google Additional Vendors, disregard the Google endpoint.
- IAB TCF Vendor List Endpoint: https://cdn.cookielaw.org/vendorlist/iab2Data.json
- Google Vendor List Endpoint: https://cdn.cookielaw.org/vendorlist/googleData.json
After retrieving the JSON specific to your App ID, you'll supply this to the SDK.
Sample code snippet
// Helper method for fetching JSON data
func getJSONData(for fileName: String) -> Data? {
    guard let path = Bundle.main.path(forResource: fileName, ofType: "json") else {
        return nil
    }

    guard let jsonData = try? Data(contentsOf: URL(fileURLWithPath: path)) else {
        return nil
    }
    return jsonData
}

// Prior to 202504.1.0
func setupOTOfflineData() -> Bool {
    guard let otData = getJSONData(for: "OneTrustData"), !otData.isEmpty else{ return false}

    // Set these only for IAB Template, else you can ignore setting the Vendors data.
    let iabData = getJSONData(for: "googleVendorJSONFile")
    let googleData = getJSONData(for: "googleVendorJSONFile")
    let vendorsData = OTOfflineData.VendorListData(iab: iabData, google: googleData)

    // Setting up the offline data for loading logos in offline mode.
    // Note: if you are not using any of the below logos, please pass in nil inside the parameter.
    let logoData = OTOfflineData.LogoData(bannerLogo: UIImage(named: "filename"),
                                          pcLogo: UIImage(named: "filename"),
                                          ageGateLogo: UIImage(named: "filename"),
                                          attLogo: nil)

    // Setting up the offline data required for setting up OT SDK in offline mode.
    let offlineData = OTOfflineData(otData: otData, vendorListData: vendorData, logoData: logoData)
    OTPublishersHeadlessSDK.shared.setOTOfflineData(offlineData)
    return true
}

// 202504.1.0 onwards
func setupOTOfflineData() -> Bool {
    let cmpBannerData = getJSONData(for: "OneTrustBannerData")
    let cmpPCData = getJSONData(for: "OneTrustPCData")

    // If IAB Template, else just dont add this line
    let cmpVendorsData = getJSONData(for: "OneTrustVendorsData")

    // If UCP is enabled, else just dont add this line
    let cmpUCPData = getJSONData(for: "OneTrustUCPData"), !cmpUCPData.isEmpty else { return false }

    let cmpApiFlowData = CmpApiData(
        cmpBannerData: cmpBannerData, cmpPreferencesData: cmpPCData,
        cmpVendorsData: cmpVendorsData
    )

    // Setting up the offline data for loading logos in offline mode.
    // Note: if you are not using any of the below logos, please pass in nil inside the parameter.
    let logoData = OTOfflineData.LogoData(bannerLogo: UIImage(named: "filename"),
                                          pcLogo: UIImage(named: "filename"),
                                          ageGateLogo: UIImage(named: "filename"),
                                          attLogo: nil)

    // Setting up the offline data required for setting up OT SDK in offline mode.
    let offlineData = OTOfflineData(
        cmpApiData: cmpApiFlowData, logoData: logoData
    )
    OTPublishersHeadlessSDK.shared.setOTOfflineData(offlineData)
    return true
}

// Must call setupOTOfflineData() first before startSDK()
setupOTOfflineData()
startSDK()
Capture Records of Consent
When a user gives consent, the SDK automatically saves the consent profile locally to disk. This is so a User's settings can be reflected in the Preference Center UI without having to make a network call.
Optionally, a user's consent can be saved to OneTrust servers, this feature is known as Capture Records of Consent and is enabled in the Geolocation Rules section of OneTrust Admin, not on the SDK locally.
Enabling Capture Records of Consent is the only way to feed OneTrust Reports and Dashboards, otherwise the consent data is only kept locally on the device.
Creating Data Subject Profiles
The SDK has the ability to display and manage consent for Universal Consent Purposes, and not just Cookie Categories. For this feature to work, the developer needs to call setShouldCreateProfile(true)method on the SDKParams config object.
If this is not done, then the server will only create Consent Receipts instead of also creating Data Subject Profiles when a user updates their choices.
Cross Device Consent
Cross Device Consent is an optional feature. These parameters are not required for initializing the SDK to fetch and display Banners and Preference Centers to users.
That said, if you are enabling the Cross Device Consent functionality, each of these OTProfileSyncParams are required to be passed to the startSDK() method to sync user profile data with the latest values on OneTrust servers. More information about the requirements for the JWT that is passed as syncProfileAuth can be found in the following article: Cross Domain and Cross Device Consent.
// Swift
let profileSyncParam = OTProfileSyncParams()
profileSyncParam.setSyncProfile("true")
profileSyncParam.setSyncProfileAuth("JWT token")
profileSyncParam.setIdentifier("userId")
profileSyncParam.setIdentifierType("identifierType")


// ObjC
OTProfileSyncParams *profileSyncParam = [[OTProfileSyncParams alloc] init];
[profileSyncParam setSyncProfile:@"true"];
[profileSyncParam setSyncProfileAuth:@"JWT token"];
[profileSyncParam setIdentifier:@"userId"];
| Parameter | Description | Required for Cross Device |
|---|---|---|
setSyncProfile | Tells startSDK to attempt Cross Device Consent profile syncing. | Yes |
setSyncProfileAuth | Use this to pass the pre-signed JWT auth token required to perform Cross Device. | Yes |
setIdentifier | Sets the identifier value used to create a user profile server-side. | Yes |
setIdentifierType | Sets the identifier type for Unified Profile | No, only when Unified Profile is in use |
IMPORTANT
Ensure that you're also setting
setShouldCreateProfile("true")to true inOTSDKParamsso a user profile is created on OneTrust servers.
Cross Device Consent Workflow
Please reference this article for Best Practices for Cross Device Consent: Cross Domain and Cross Device Consent.
You can reference the following article for Implementation guidance on moving from Anonymous to known state: Override Server Consent - Anonymous to Known State.
Updated 3 days ago